Thursday, May 27, 2010

Beer Can Chicken

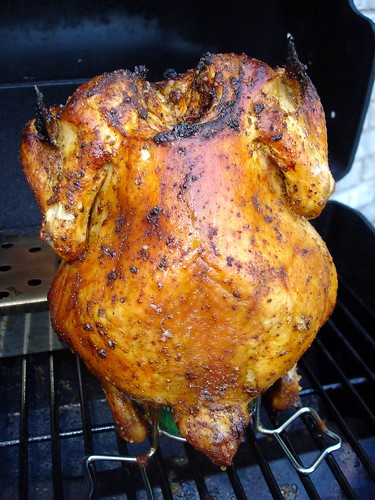
The first time I had Beer Can Chicken was last summer while visiting my brother, Larry and sister-in-law, Aggie.  I don't know why I waited a year to make it myself.  This is such a fun and delicious way to make chicken on the grill.  It turned out super good.  Give it a try this Memorial Day weekend or during the summer.  It will make a great presentation for your family and friends.  

The recipe I followed was from Steven Raichlen's cookbook, How to Grill, The Completed Illustrated Book of Barbecue Techniques.  My mother-in-law gave us this book years ago and it's an excellent all-around barbecue cookbook.  


See below for the Barbecue Rub recipe and some of my tips with preparing and cooking this chicken.


I used the Basic Barbecue Rub from the How to Grill Cookbook.  I make a batch and keep it in an airtight container.  It's a great barbecue rub to use on a variety of meats and seafood.

Basic Barbecue Rub
Recipe from Steven Raichlen’s How To Grill cookbook

1/4 cup (packed) dark brown sugar
1/4 cup paprika
3 tablespoons black pepper
3 tablespoons coarse salt (I used Kosher)
1 tablespoon hickory-smoked salt or more coarse salt
2 teaspoons garlic powder
2 teaspoons onion powder
2 teaspoons celery seeds
1 teaspoon cayenne pepper

Combine all the ingredients in a bowl and stir or whisk to mix. Transfer to an airtight jar or container and store away from heat and light. The rub will keep for at least 6 months.

Makes 1 cup

Tips:  Use a 12 oz can of beer.  Pour half out (you can drink it of course or use it along with water to soak your wood chips, if using).  I put 2 teaspoons of the barbecue rub in the beer.  I put 2 heaping teaspoons of the rub in the body and neck cavities of the chicken.  I rubbed canola oil on the outside of the chicken and then applied about 3 teaspoons of the rub all over the outside of the chicken.  

I bought a Beer Can Chicken holder at Lowes for a few dollars and it worked great.  There were no worries that the chicken was going to fall over.  I also used a wood chip smoking box that I also purchased at Lowes along with a bag of Apple wood chips.  I have a gas grill and I've never used the wood chips but always wanted to try them.  I soaked about 4 handfuls of the wood chips for at least 30 minutes.  You place them in the smoking box and place on the heated grill for about 10 minutes until it gets really smoking.  Then you put the chicken on the grill on the side with no burner on. (this will keep it from burning)  You keep the other side burner on and close the lid.  You may not think the chicken will cook but it does.  It takes about 1 1/4 hours but I recommend checking the temperature at 1 hour.  It should be about 180 degrees when inserted in the thigh.  It smelled incredible.  I'm sure all my neighbors were jealous : ) 

Let it rest for at least 5 minutes before taking it off the beer can.  My husband used tongs placed under the chicken to pull it carefully off the beer can.


This chicken was close to 4 1/2 lbs and it was ready in about 1 hour and 10 minutes.  See how the Beer Can holder works and keeps that chicken steady.  You can also see the smoking box in the back of the grill.  I loved using the wood chips.  It gave the chicken an extra flavor to it and it wasn't overly smoked at all.  I can't wait to try some other wood chips like hickory and mesquite.


Enjoy!

Mom's Cooking Club Lesson:  You can vary your can with root beer, cola or lemon lime soda.  You can also use your own favorite barbecue rub.     

Tuesday, May 18, 2010

Dinner is served.....Chicken Milanese with Spring Greens and Parmesan-Browned Butter Orzo


If you read my blog, you know I like to make many recipes from Cooking Light magazine and their website.  There's a section in their magazine called Dinner Tonight which gives recipes for an entire meal.  The recipes usually take 30 or 40 minutes to make.  This meal plan is in their May 2010 magazine edition.

This is one of those family pleasing, family happy meals.  At least in my house it was.  The chicken was so flavorful and tender.  And it's pan seared in a little olive oil.  I did add a little extra olive oil when browning the other side of the chicken and for the 2nd batch.  The chicken went perfect with the orzo side dish.  And the light lemony salad dressing was the perfect complement to the whole meal.  This is a dinner that I know I will make again.

Note:  I did double the chicken recipe ingredients because the recipe listed is for 2 servings and I needed 4 servings.

Click here for the Chicken Milanese with Spring Greens recipe 

Click here for the Parmesan-Browned Butter Orzo recipe

Note:  The orzo recipe posted has a typo.  The recipe ingredient list has 1 1/4 cups of chicken broth but the instructions say to use 1 cup chicken broth.  You actually use 1 1/4 cup chicken broth.


Dinner is served!

Enjoy!

Mom's Cooking Club Lesson:  You want the chicken breasts to be thin so to make it easier to pound thin, I butterfly (cut) the boneless chicken breasts in half, longways, but not all the way through. You open it up and you have a very large chicken breast. I pounded the butterflied chicken breast to about 1/2 inch thickness. It is much easier to pound it thin like this then starting with the whole thick chicken breast. You can buy the thin sliced chicken breasts but I find them to be too thin sometimes.

Tuesday, May 11, 2010

Pumpkin Chocolate Chip Bread


Do you still have any cans of pumpkin in your pantry?  Or does your store still carry pumpkin this time of year?  If so, you must make this quick bread.  Who said pumpkin bread is just for fall and the winter months?  It really is for any time of year.  This recipe comes from one of my favorite blogs, Barbara Bakes.  My entire family loved this bread.  Even my picky eater, Mariah, who doesn't like pumpkin bread, loved this one.  I think it had something to do with the chocolate chips.  This recipe makes 2 medium loaves and I took some slices to work.  My co-workers loved it also and my boss has requested the recipe.  So, thanks Barbara for passing on a wonderful recipe that I will make over and over again.

Note:  I used mini chocolate chips instead of regular size since that's what I had in my pantry.    

Please go to Barbara's blog HERE to get the recipe for this moist and delicious Pumpkin Chocolate Chip Bread.       


Enjoy!

I also wanted to mention that my 1 year blog anniversary was May 6th.  I didn't want to make a big deal about it but I can't believe I have been doing this for a year.  What fun it has been to share recipes with you and to "meet" so many incredible bloggers who inspire me everyday.  I want to thank everyone who has ever visited my blog and to those who have left comments.  I really do appreciate all my visitors.  I'm looking forward to another year of cooking, baking, eating and sharing!  

On a final note, I hope everyone had a wonderful Mother's Day this past Sunday.  I spent the day at the beach with my husband and 2 daughters.  It was a gorgeous day.  I posted some photos of the day below.


The beautiful and peaceful Gulf of Mexico


Mariah and Marissa braving the cold water


Me and my girls.....I'm a lucky mom!


Marissa found this awesome shell.  It's on my kitchen windowsill now where I can enjoy it and remember this perfect day.   

Mom's Cooking Club Lesson:  The pumpkin bread calls for 1 teaspoon of pumpkin pie spice.  The recipe also notes that you can substitute 1/2 teaspoon ground cinnamon plus 1/4 teaspoon ground ginger, 1/4 teaspoon ground nutmeg and 1/8 teaspoon ground cloves for 1 teaspoon pumpkin pie spice.  Just continue with the remaining spices listed in the recipe which does call for 2 more teaspoons of cinnamon.


Wednesday, May 5, 2010

Mushroom Frittata for a Cooking Light Mother's Day Brunch

The Cooking Light Virtual Supper Club wanted to celebrate Mother's Day this month by coming up with a wonderful brunch menu.  A perfect way to celebrate the mom(s) in your life.  The Cooking Light Virtual Supper Club started last July when 5 bloggers from different parts of the U.S and Canada come together "virtually" every month to share a menu theme and recipes from Cooking Light's magazine, cookbooks and website. 

This month there will be some changes as we say goodbye to 2 members.  Aggie from Aggie's Kitchen and Helene from La Cuisine d'Helene.  Both of these busy moms have other commitments and family obligations right now.  Both Aggie and Helene will always be honorary members and can come back and join us any time.  

However, we would like to welcome 2 new moms to the Cooking Light Virtual Supper Club.  Say a big hello to Patsy from Family, Friends & Food and Sandi from Whistlestop Cafe Cooking.  Patsy lives in New Jersey and Sandi lives in Alabama.  Both of these ladies enjoy Cooking Light recipes as much as we do.  We're very happy to have them join us. 

Now, on to the Mother's Day Brunch Menu:

Patsy from Family, Friends and Food made Triple Fruit Scones
Jamie from Mom's Cooking Club made a Mushroom Frittata
Shelby from The Lives and Loves of Grumpy's Honeybunch made Waffles with Two Berry Syrup
Val from More Than Burnt Toast made a Sweet Potato and Canadian Bacon Hash
Sandi from Whistlestop Cafe Cooking made Grits Casserole with Pesto Butter

I made the Mushroom Frittata in my cast iron skillet and it was delicious.  If you like mushrooms this is the dish for you.  It can be for breakfast, brunch, lunch or even a light dinner.  The recipe calls for an exotic mushroom blend but I used half white mushrooms and half baby portabella mushrooms.       

Make sure you click on the links above to read all about the other members individual dishes.

Click here for the Mushroom Frittata recipe on Myrecipes.com


Enjoy!

Mom's Cooking Club Lesson:  I want to wish all my friends and family a very Happy Mother's Day.  And I'm sending a huge Mother's Day wish to my own mom.  I love you mom and wish we weren't so far apart so we could have a brunch celebration together.  Happy Mother's Day everyone! 

Saturday, May 1, 2010

Sloppy Joe Sliders


This is a really good Sloppy Joe recipe that the whole family will enjoy.  It's got that sweet, spicy and smokey combination that I love.  Serve them on mini buns/slider rolls.  My girls just loved eating them on these little rolls.  They couldn't be easier to make which is perfect for a quick weeknight meal. 

I found this recipe in Food Network Magazine.  They call it Cafeteria Sloppy Joes.  These are much better than any cafeteria Sloppy Joes I've ever eaten.  


Enjoy!

Mom's Cooking Club Lesson:  I'm seeing more and more companies offering mini buns/slider rolls.  I used Sara Lee Mini Buns found in my grocery store's bread aisle.  My daughters also liked using them for mini sandwiches in their lunch boxes. 

 
Blog Design By: Sherbet Blossom Designs