Friday, October 29, 2010

Chocolate Chip Biscotti - 12 Weeks of Christmas Cookies, Week 5

Chocolate Chip Biscotti

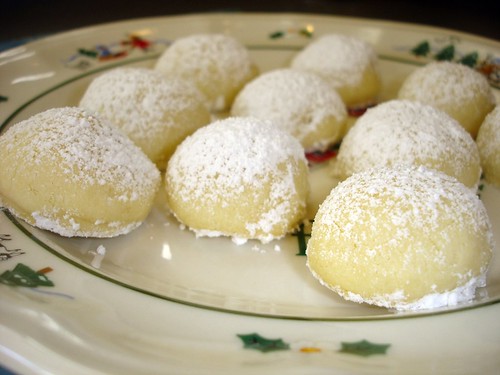
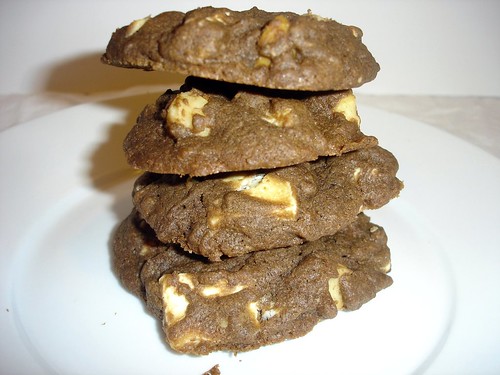
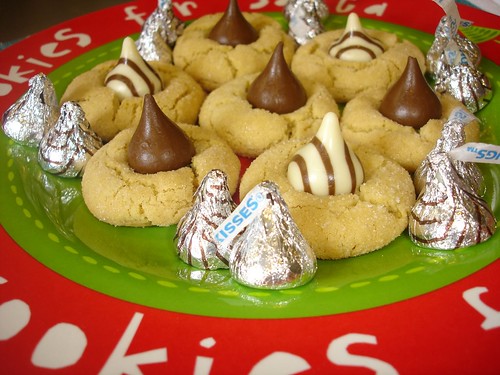
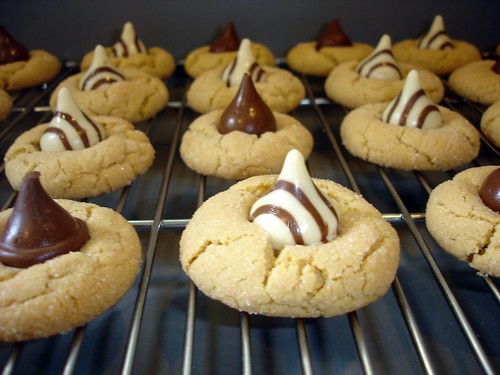
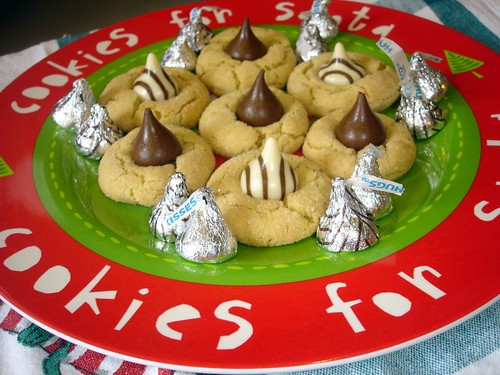
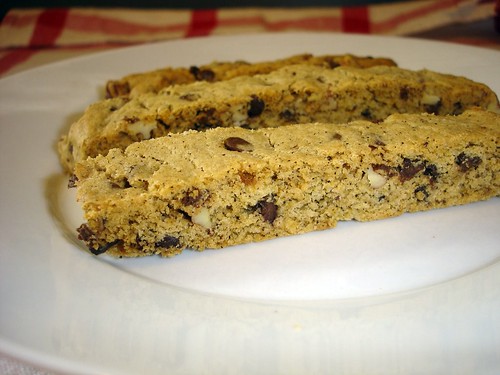
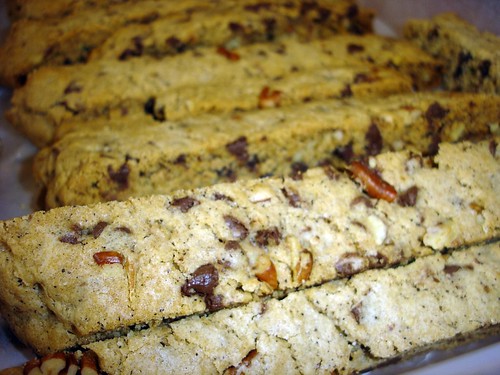
Happy Friday everyone!  Here's my cookie for the 5th week of the 12 Weeks of Christmas Cookies.  I have never made biscotti.  What has taken me so long?  These chocolate chip biscotti are awesome.  They are crunchy the way a biscotti should be but not so hard you can't bite into them.  They are full of mini chocolate chips and chopped pecans.  The addition of ground espresso coffee and cinnamon really up the flavor of these biscotti.  Seriously, you don't have to buy them at coffee shops anymore.  Make them yourself and you'll be hooked.  

Chocolate Chip Biscotti
Recipe by Southern Living, America's Best Home Cooking Cookbook

(printable recipe)

Yield: 2 1/2 dozen

Ingredients

1/2 cup butter or margarine, softened
1/2 cup firmly packed brown sugar
1/2 cup sugar
1 tablespoon instant coffee or espresso granules (I used Cafe Bustelo ground espresso)
2 large eggs
2 cups all-purpose flour
2 teaspoons baking powder
1/2 teaspoon salt
1/2 teaspoon ground cinnamon
1 cup chopped walnuts or pecans, toasted ( I used pecans)
1 cup semisweet chocolate mini-morsels

Preparation

Combine first 4 ingredients in a large bowl; beat at medium speed with an electric mixer until light and fluffy. Add eggs, 1 at a time, beating until blended.

Combine flour, baking powder, salt and cinnamon; add to butter mixture, stirring until blended. Fold in chopped nuts and chocolate morsels.

Divide dough in half, and shape each dough portion into a 13 x 2-inch log on a lightly greased baking sheet.  Pat dough to 1 inch thickness.

Bake at 350° for 23 - 25 minutes or until firm. Cool on baking sheet 5 minutes. Remove to wire racks to cool completely.  Note:  When I tried to move the biscotti dough to the cooling racks they started to break so I left them on the pan to cool and cut them on the baking pan.

Cut each log diagonally into 1/2-inch-thick slices with a serrated knife using a gentle sawing motion, and place slices, cut side down, on ungreased baking sheets.

Bake slices at 350° for 15 minutes; turn cookies over, and bake 10 - 15 additional minutes. Remove cookies to wire racks to cool completely.


Biscotti

Enjoy!


Mom's Cooking Club LessonGift/Packaging Idea  -  Place a few chocolate chip biscotti in a holiday treat bag.  Twist tie and attach a wrapped tea bag.  I used the end of a paperclip to poke a hole in the corner of the tea bag.  Thread some ribbon through it to attach to bag.  I picked a cinnamon tea but use any flavor.  Place cookie package in a Christmas mug.  Give to someone special.    


Monday, October 25, 2010

Chicken and Rice with The Kids Cook Monday!


I have a Monday recipe for you today that I know your family will enjoy.  I just love the combination of chicken and rice.  Such a comfort meal.  The mushroom rice mixture and the addition of Romano cheese on top of the chicken makes this meal so flavorful.  The carrots and mushrooms in the rice and using skinless bone-in chicken thighs keeps this dish healthier.  Give this recipe a try soon and start your week off in a healthy and satisfying way.


Chicken and Rice
Recipe by Cooking Light, October 2010

Serves 4

Ingredients

1 tablespoon olive oil
8 bone-in chicken thighs, skinned
3/4 teaspoon salt
1/4 teaspoon ground black pepper
2 cups chopped onion ( I used approx. 1 cup)
1 carrot, thinly sliced
8 ounces cremini (baby portabella) mushrooms, sliced
4 garlic cloves, minced
1 cup long-grain white rice
Cooking spray
1 cup fat-free, lower-sodium chicken broth
1/4 cup water
3 tablespoons heavy whipping cream
1/3 cup (1 1/2 ounces) grated fresh pecorino Romano cheese

Preparation

1. Preheat oven to 350°.
2. Heat oil in a skillet over medium-high heat. Sprinkle chicken with salt and pepper. Add 4 chicken thighs to pan; sauté 3 minutes on each side or until browned. Remove chicken from pan. Repeat with remaining chicken.
3. Add onion and carrot to pan; sauté 4 minutes. Add mushrooms; sauté 5 minutes. Add garlic; sauté 1 minute, stirring constantly. Add rice; sauté 1 minute. Spoon rice mixture into a 13 x 9-inch glass baking dish coated with cooking spray; stir in broth, 1/4 cup water, and cream. Arrange chicken over rice mixture; sprinkle with cheese. Bake at 350° for 45 minutes or until chicken is done.


My kids are busy in the kitchen.  Taking the stems off the mushrooms, browning the chicken and making the rice mixture.  Tips on getting your kids to help in the kitchen and to make Mondays (or any day) family night, check out The Kids Cook Monday website.  


The rice mixture is full of carrots and mushrooms which is started in a skillet before baking with the chicken. 


It may not be the most "pretty" food picture but it really, really does taste good.

Enjoy!

Mom's Cooking Club Lesson:  I don't shy away from recipes or cooking with ingredients I know my daughters don't like.  Take this Chicken and Rice for example.  My daughters do love chicken and they do love rice.  They, however, do not like mushrooms which is in the rice mixture.  They just picked out the mushrooms.  Funny thing is they loved the rice even though it was heavily flavored with mushrooms.  So, keep introducing the "I don't like that" foods to your kids.  Their likes and dislikes are always changing.  I have a feeling when my daughters get older, they will end up loving mushrooms.   

Friday, October 22, 2010

Melting Moments.......Week 4 of The 12 Weeks of Christmas Cookies

Melting Moments

I'm back to share another cookie recipe for the 4th week of the 12 Weeks of Christmas Cookies.  This week I have some wonderful butter cookies called Melting Moments.  They really do melt in your mouth.  They are buttery, delicate and not too sweet.  Perfect with a cup of tea.

What I love about these cookies is that they only have 6 ingredients.  Everyday ingredients that are usually stocked in your kitchen.  Another great cookie for my cookie tray this year.  


Melting Moments
Recipe by Joy of Baking

Yield:  3 Dozen Cookies

Ingredients

1 1/2 cups all purpose flour
1/2 cup cornstarch
1/4 teaspoon salt
1/4 cup powdered (confectioners) sugar
1 cup unsalted butter, room temperature
1 teaspoon pure vanilla extract

Topping

1 cup powdered (confectioners) sugar, sifted

Directions

In a medium sized bowl whisk together the flour, cornstarch and salt. Set aside.

In the bowl of your electric mixer (or with a hand mixer), beat the butter and sugar until light and fluffy (about 2 minutes). Beat in the vanilla extract. Add the flour mixture and beat until incorporated. Cover and refrigerate the dough for at least one hour or until firm.

Preheat oven to 350 degrees and place rack in center of oven. Line two baking sheets with parchment paper.

When dough is firm, form into 1 inch balls and place the cookies on the prepared baking sheets spacing about 1 inch apart. Bake for about 12 - 14 minutes or until the edges of the cookies start to brown. Remove from oven and place on a wire rack to cool for about 5 minutes.

Meanwhile, line another baking pan or tray with parchment or wax paper. Sprinkle about half of the confectioners (powdered) sugar onto the bottom of the pan and then place the slightly cooled cookies on top of the sugar. Put the remaining sugar in a fine strainer or sieve and then sprinkle the tops of the cookies (or you can just roll the cookies in the sugar).  I like the look of dusting the powdered sugar on the cookies by using a fine strainer.  It gives it that light, snowy look.  

Place in an airtight container between sheets of wax paper and they will keep a couple of weeks.


Last week there were over 50 links to the 12 Weeks of Christmas Cookies.  I love all the other recipes that are being shared.  I'm getting so many great recipes and ideas.  Check out this week's blog hop link at the bottom of my post.  And keep checking back as more recipes are added in.


Gift Packaging

I found this white container at Michaels.  I added in some blue tissue paper and my daughters decorated it with felt snowflake stickers.


I also found these recipe cards at Michaels in the $1 bin.  Twenty cards per pack for a dollar per pack.  What a great deal and cute too!


Melting Moments in Box

This is just for demonstration purposes.  Of course the recipe card would be filled out with the recipe on it. 

Enjoy!

Mom's Cooking Club Lesson:  Since these cookies remind me of snow and melting snow, I wanted to keep with the snowflake theme.  Place cookies in white box (like above) or white tin lined with blue or white tissue paper.  Decorate with snowflake stickers and include recipe card.


Monday, October 18, 2010

Grilled Barbecue Shrimp with The Kids Cook Monday!

Barbeque Shrimp

Yes, it is October.  Yes, it is Fall.  The end of summer doesn't mean the end of grilling for us.  We grill all year round.  We eat and grill quite a bit of seafood.  So, for this week on The Kids Cook Monday is a very quick and healthy barbecue shrimp dinner.  We served this with rice that was mixed with some sauteed corn, green pepper and green onions.  

The Kids Cook Monday is part of a public initiative called the Monday Campaigns.  The Kids Cook Monday program helps parents along with their kids cook and eat healthful meals week after week.  Check out their website for more details and tools to help start your week off on a good foot.


Grilled Barbecue Shrimp
Recipe by Mom's Cooking Club 


Ingredients

1 to 1 1/2 pounds peeled and deveined shrimp
1 - 2 teaspoons barbecue rub (prepared or your own blend)
barbecue sauce (use your favorite)
canola oil

Directions

Place shrimp in single layer on baking sheet.  Drizzle some canola oil over shrimp.  Sprinkle 1 - 2 teaspoons of barbecue rub over shrimp.  Toss well to coat.  Place shrimp on grill over low to medium heat.  Grill about 3- 4 minutes, turn over and brush with barbecue sauce.  Turn again after about 3 minutes and continue brushing with barbecue sauce.  Continue to grill until cooked.  Pull off shrimp that is cooked through and place on platter.  Move shrimp to hotter parts of grill to finish cooking completely.  Shrimp cook fairly fast so keep a close eye on them.


Mariah helped me prepare and grill the shrimp.  Even though she doesn't like shrimp, she was willing and very able to help.  Mariah seasoned the shrimp with a prepared barbecue rub. 


My husband, Mike, does all the grilling but he gave it up this time to teach Mariah some of his grilling tricks.


Mariah showing off her grilled barbecue shrimp.  It was delicious! 


Grilled Barbeque Shrimp

Enjoy!

Mom's Cooking Club Lesson:  Take it outdoors and have your kids help while grilling food.  They can learn about grilling techniques and you can teach them a different method of cooking.  Plus, it's fun to be outdoors and enjoying the fall weather together. 

Friday, October 15, 2010

12 Weeks of Christmas Cookies: Week 3.......Black and White Cookies

Black and White Cookies

Here's my 3rd cookie in the 12 Weeks of Christmas Cookies!  This week I have a chocolate cookie for you but this one is full of some goodies.  Some of my favorite goodies....white chocolate and macadamia nuts.  Some bites you get the creamy white chocolate, others bites you get the crunchy, buttery macadamia nuts and other bites you get it all.  So good!

These are large cookies.  Don't be afraid to use the 1/4 cup of dough per cookie.  You want them to be big.  Don't forget to check out the blog hop at the bottom of my post to see what other bloggers baked up this week.


Black and White Cookies
Recipe by Betty Crocker , Cookies & Bars, Sept. 2009 

Makes 20 - 24 cookies

Ingredients
1 cup packed brown sugar
1 cup butter or margarine, softened
1 teaspoon vanilla
2 eggs
2 cups all-purpose flour
1/3 cup unsweetened baking cocoa
1 teaspoon baking soda
1/4 teaspoon salt
2 (4 oz) white chocolate bars. chopped (I used Ghirardelli)
1 jar (3.25 oz) macadamia nuts, coarsely chopped

Directions

1.Heat oven to 325°F. In large bowl, beat brown sugar, butter, vanilla and eggs with electric mixer on medium speed, or mix with spoon, until creamy. Stir in flour, cocoa, baking soda and salt. Stir in white chocolate chunks and nuts.

2.Drop dough by 1/4 cupfuls about 2 inches apart onto ungreased large cookie sheet (do not use dark cookie sheet).

3.Bake 13 to 16 minutes or until cookies are set and appear dry (do not overbake). Cool 1 minute; remove from cookie sheet to wire cooling rack.  Store in covered container.


Here are some of my other favorite black and whites.  But, sorry, these won't be on my cookie tray : )


Black and White cookies on plate

Enjoy!

Mom's Cooking Club LessonGift/Packaging Idea:  Instead of the traditional red and green Christmas colors, use an all black and white theme.  Look for a decorative black and white box along with some black and white tissue paper.  Purchase a black, white or black & white mug, some packets of hot chocolate and a bag of marshmallows.  Put some of the Black & White Cookies in a clear bag, tied with black and white ribbon.  Place all the items in the box.  Don't forget to include a recipe card for the cookies.

Monday, October 11, 2010

Chicken Tortilla Soup with The Kids Cook Monday!


Is it starting to get a little cooler where you live?  It's still warm here in Florida but we've been having cooler mornings and nights so I know our Fall weather will be here shortly.  It's the perfect time for soup (even though I love eating homemade soup anytime of the year). 

I thought this would be a great chance to try a new soup recipe for a healthy start to the week.  Make sure to check out the website for The Kids Cook Monday!  for tips and ideas on how to start your week off in a positive way.  

This soup is comforting and filling.  It's full of good for you ingredients and was enjoyed by all.  I recommend adding salt to taste and adding more chili powder or cayenne pepper if you like your tortilla soup a bit more spicy. 

I love discovering new blogs.  I get so many recipe ideas and inspiration.  This recipe comes from the blog, Skinny Kitchen.   Check it out for more ideas on making meals healthier.


Chicken Tortilla Soup
Slightly adapted, Recipe by Skinny Kitchen

5 - 6 servings

Ingredients

1 tablespoon plus 1 teaspoon extra virgin olive oil
1 ½ - 2 cups chopped onion
2 tablespoons chopped garlic
2 (6-inch) corn tortillas, chopped
2 tablespoons tomato paste
2 teaspoons paprika
1 teaspoons chili powder
1 teaspoon cumin 
⅛ teaspoon ground red pepper
6 to 6 1/2 cups reduced-sodium chicken broth
1 (15 oz) can diced tomatoes - I used fire-roasted tomatoes
1 (14 oz) can yellow hominy, drained and rinsed
1 (14 oz) can low sodium black beans, drained and rinsed
2 cups cooked chopped chicken - see cooking tip at bottom of post
Juice of one lime

Topping

1 ¼ cups tortilla chips, crushed
Shredded Cheddar cheese - optional

Instructions

1. In a large nonstick pot, add the olive oil, onions and garlic. Sauté for 1 minute.
2. Add the chopped tortillas, tomato paste, paprika, chili powder, cumin and cayenne pepper and sauté for 2 minutes.
3. Stir in the chicken broth and tomatoes. Bring up to a boil, turn down heat and simmer for 15 minutes.
4. Add the hominy, beans, chicken and fresh squeezed lime juice. Mix well. Cook 10 minutes more.
5. Garnish with shredded cheese and crushed tortilla chips.


I've never used Hominy before and honestly didn't know what it was.  Good time for a learning opportunity. So, Mariah looked it up on the internet. 

Per Recipetips.com, Hominy is:  "A corn product created by soaking white or yellow corn kernels in scalding water that is mixed with a chemical solution, such as a mild lye or slaked lime. The soaking forces the kernel to expand so the hull and germ split. This allows the kernel to be easily removed so that the remaining corn substance can be dried. After it has been dried, the whole kernels are soaked in water and a solution mixed with limestone or wood ash to expand the kernels, which are then boiled, creating a soft puffy food product referred to as Hominy.  Whole hominy can be boiled or fried and served as a side dish, with or without additional ingredients (meat, vegetables, or other foods), formed into cakes, or served as a filler in soups, stews and salads. Hominy grits are another form of hominy, produced by grinding the dried and processed corn kernels several times into a finer grained substance to be sold as fine, medium, or coarse textured hominy." 


The girls really helped me out in the kitchen today.  Marissa cut up the cooked chicken and helped pour in some of the ingredients like the beans and diced tomatoes.  Mariah sauteed the onions as I was busy prepping the other ingredients.


Enjoy!

Mom's Cooking Club Lesson:  Time saving tip for cooked chicken - Roast chicken breasts the night before or in morning.  Place in refrigerator.  You then have cooked chicken ready to use in your recipe that is moist, juicy and flavorful.  Directions:  Preheat oven to 450 degrees.  Use chicken breasts with bones and skin and place on baking sheet.  Drizzle some canola or olive oil over chicken and season with salt/pepper.  Place in top portion of oven and roast for 30 minutes or until chicken is cooked through.  Pull off skin and discard.  Shred or cut up cooked chicken as needed in your recipe. 

Friday, October 8, 2010

12 Weeks of Christmas Cookies......Lime Meltaways

Lime Meltaways

Happy Friday everyone!  It's week 2 of the 12 Weeks of Christmas Cookies!  I have a lime cookie today that might add a little Florida sunshine to your cookie plates this year.  Citrus always reminds me of Florida and well since I'm from Florida, I thought these would give you a reminder of summer and warmer weather when the cold of December hits. 

I first saw these cookies on Barbara Bakes last year and I've made them several times since.  They are refrigerator cookies which means you make the cookie dough, roll them into logs wrapped in parchment paper, chill in refrigerator for a short time, then slice & bake.  Perfect for making the dough ahead of time and baking them later or baking a few at a time.  You can also freeze the dough logs for up to 2 months.

These lime butter cookies are wonderful.  The lime zest and lime juice give it the right amount of citrus flavor.  They are small, which is good, but you won't be able to stop eating them and that could be bad.  I hope you enjoy these cookies and the sunshine that comes with them.

Check out the links at the end of this post with the other cookie participates.  Keep checking back because the linky list grows daily for the week.


Lime Meltaways
Recipe by Martha Stewart

3 dozen cookies

3/4 cups (1 1/2 sticks) unsalted butter, room temperature
1 cup confectioners’ sugar
Grated zest of 2 limes
2 tablespoons freshly squeezed lime juice
1 tablespoon pure vanilla extract
1 3/4 cups, plus 2 tablespoons all-purpose flour
2 tablespoons cornstarch
1/4 teaspoon coarse salt


Directions

1. In the bowl of an electric mixer with the whisk attachment (I used my regular paddle attachment), cream butter and 1/3 cup sugar until fluffy. Add lime zest, juice, and vanilla; beat until fluffy.

2. In a medium bowl, whisk together flour, cornstarch, and salt. Add to butter mixture, and beat on low speed until combined.

3. Divide dough in half.  Place each half on a separate 8 by 12 inch piece of parchment paper, roll dough into 1 1/4-inch diameter logs. Chill at least one hour.

4. Heat oven to 350 degrees. Line two baking sheets with parchment paper. Place remaining 2/3 cup sugar in a resealable plastic bag. (I placed in bowl)  Remove parchment from logs; slice dough into 1/8-inch thick rounds. (I sliced them more like a 1/4 inch) Place rounds on baking sheets, spaced 1 inch apart.

5. Bake cookies until barely golden, about 15 minutes. Transfer cookies to a wire rack to cool slightly 8 to 10 minutes. While still warm, place cookies in the sugar-filled bag; toss to coat. (I put powdered sugar in a bowl and added baked cookies to coat)  Bake or freeze remaining dough. Store baked cookies in an airtight container for up to 2 weeks.


Lime Cookies

Enjoy!

Mom's Cooking Club LessonGift/Packaging Idea - Here's a fun gift basket you can put together.....Get a basket or Christmas basket and fill it with shredded gift paper for baskets.  How about Lime Green basket filler?  Put limes (at least 2) in basket along with a Microplane Zester.  You can get one with a red handle for Christmas or I've seen ones with Lime Green handles.  Put some cookies in a holiday treat bag and place in basket along with recipe card.  Give to some favorite people in your life!


Wednesday, October 6, 2010

Candied Walnut, Pear and Leafy Green Salad.....October's Cooking Light Virtual Supper Club

Candied Walnut and Pear Salad

I've mentioned this before.  I love fruit in salad.  Now I love fruit and Candied Walnuts in salads.  The group of blogger's that showcase the recipes from Cooking Light are back this month with the theme of Vegetarian Potluck.  Alot of people are eating vegetarian these days or at least trying to do a few meatless meals a week.  I'm not a vegetarian but I do try to strike a balance with my meals and eating more meatless meals is a good idea to get that balance.

Salads can get boring which is why I'm always changing up the lettuces, vegetables and dressings that I use.  This is a wonderful salad that I will make again. The candied walnuts are simple to prepare and so addicting.  They are great just as a snack alone.  I used Bartlett pears because that's what my grocery store had in stock.  Any pear that is in-season would work just fine.  I also used mixed spring lettuce.  You will love this salad with the sweetness of the pears, crunch of the walnuts and the dressing which brings it all together.


What did the others from the Cooking Light Virtual Supper Club bring?


Jamie (me) from Mom's Cooking Club made Candied Walnut, Pear and Leafy Green Salad.
Val from More than Burnt Toast made Butternut Squash Lasagna
Sandi from Whistlestop Cafe Cooking made Carrot Cake

Note:  Shelby (The Life and Loves of Grumpy's Honeybunch) was not able to join us.  She is in the midst of moving to another city.  Good luck Shelby!

**Patsy was also unable to join in with this month's get-together.  I still added the link to her recipe to share her vegetarian choice.


Pear Salad

Enjoy!

Mom's Cooking Club Lesson:   Gift/Packaging Idea -  Make up a large batch of the candied walnuts and put them in a pretty tin or container.  Place some fresh pears in a basket with the container of candied walnuts.  Include a recipe card with this salad recipe.  You can put together this gift basket as a hostess or holiday gift.  Also, for a teacher, a neighbor or for saying thank you to someone.     

Monday, October 4, 2010

The Kids Cook Monday with Oatmeal Pancakes

DSC04611

When I told my girls I was making Oatmeal Pancakes for this week's Kids Cook Monday dish, I got the look.  You know.  The "ewwww, yucky" look.  My daughters don't like cooked oatmeal.  Well, that doesn't stop me from making things they don't like.  I still do because I know how quickly their tastes can change.

These pancakes were a different change from my normal buttermilk pancakes that I make.  But they were a good change.  They were very good, hearty and filling.  Everyone really liked them except Mariah.  She's a textural eater and doesn't like oatmeal but she did eat 1/2 of one.  I give her credit for trying something new.  

I found this recipe on the blog, Smitten Kitchen.   


Oatmeal Pancakes
Slightly adapted from Smitten Kitchen

Ingredients
3/4 cup oat flour (you can buy oat flour but to save money I put 1 cup of old fashioned oats in my mini food processor and pulsed it until finely ground.  I then measured out 3/4 cup)
1 cup all-purpose flour
2 tablespoons sugar
2 teaspoon baking powder
3/4 teaspoon Kosher or coarse salt
3 tablespoons unsalted butter, melted and cooled slightly (plus extra for the pan)
1 1/4 cups milk (I used 1% milk)
1 cup cooked oatmeal (I used Quaker Oats-Old Fashioned and followed instructions on package)
1 tablespoon honey
2 large eggs

Directions

Whisk the dry ingredients (oat flour, flour, sugar, baking powder and salt) together in a large bowl. In a smaller bowl, whisk the butter, milk, cooked oatmeal, honey and eggs until thoroughly combined. Gently fold the wet ingredients into the dry ingredients.

Heat a 10-inch cast-iron pan or griddle over medium heat.  Melt about 1 tablespoon butter in the pan. Scoop about 1/4-cup of batter onto the pan, 2 or 3 at a time. Once bubbles have begun to form on the top side of the pancake, flip the pancake and cook until the bottom is dark golden-brown, about 5 minutes total. Melt a small amount of butter in pan between batches.  Continue making pancakes with the remaining batter.  Serve and enjoy with your favorite syrup!


"The Kids Cook Monday is an initiative of the Monday Campaigns, a nonprofit organization that seeks to make Monday the day to start and sustain healthy behaviors."  Check out their website for a downloadable toolkit that will help you and your family cook and eat together every Monday.  It can be Breakfast, Lunch or Dinner. Enjoy your time cooking together and eating together. 


Marissa helped me in the kitchen today.  


Oatmeal Pancakes

Making these pancakes in my cast iron skillet really gave them crispy edges which was delicious.

Enjoy!

Mom's Cooking Club Lesson:  Oatmeal has many health benefits and doesn't have to be just in a bowl for breakfast.  Have a breakfast night for dinner and try these better for you pancakes.  Add some fruit on the side for even more health benefits.    

Friday, October 1, 2010

Welcome to the 12 weeks of Christmas Cookies!.......Peanut Blossoms

Peanut Blossoms

I'm super excited about the next 12 weeks.  I have joined a group of other bloggers who will be posting a Christmas cookie recipe every Friday for the next 12 weeks.  Links to the other bloggers will be at the bottom of this post so be sure to check out their cookies as well.  Thanks to April from Abby Sweets for organizing this group event. 

I will be sharing with you a variety of cookies.  There are so many types to choose from.  Drop, Bar, Rolled, No Bake, Refrigerator, Molded, Pressed.  My challenge will be to not gain any weight during the next 12 weeks.  And that goes for my husband and daughters as well.  They are HUGE cookie eaters!  Especially my home baked ones. : )  Friends, co-workers and neighbors....be prepared for some cookie sharing!  

 I decided to go with a classic, kid-friendly and all-around yummy cookie for my first post.  Peanut Blossom Cookies was a Pillsbury Bake-Off recipe in 1957 by Freda Smith from Ohio.  She wasn't the winner but she's a winner in my book.  I remember these cookies when I was young and how cool that I can pass them on to my daughters. I guess that's what makes a classic, a classic.  How can you go wrong with a peanut butter cookie and a Hershey chocolate kiss on top?  

Click HERE for the original Pillsbury Bake-Off recipe and HERE for the Hershey's recipe.

Both of these recipes use shortening in their recipes.  I didn't have this ingredient in my pantry so I went with the recipe from Joy of Baking which uses all butter instead.  Please click HERE for a printable version of the recipe.

I used Milk Chocolate Kisses and Hugs (milk chocolate and white chocolate swirled together).  There are several flavors that you can choose from now that would change this cookie up a bit.  How about their Special Dark or Caramel Filled Kisses?  Hershey's has a new Kiss out called Meltaway Milk Chocolates with a smooth meltaway center.  Have fun with it and come up with your own flavor combinations. 

So, are you ready to bake up some Christmas Cookies now?  


Peanut Blossom lineup

These cookies are so much fun to look at and fun to eat too!  Your kids will love making these cookies with you.  My daughter, Marissa, unwrapped the chocolate kisses and put them on top of the cookies when they came out of the oven.  The heat from the cookie starts to melt the chocolate kiss which becomes the "glue" to keep the kisses secured to the cookies.  Genius! 


Plate of Peanut Blossoms

See you next Friday with another cookie recipe.
Enjoy!

Mom's Cooking Club LessonGift/Packaging Idea:  Pick up some inexpensive, but cute, Christmas plates.  The one above is an acrylic plate I got on clearance at Target last year, only 75 cents.  I picked up a few to use for this year.  Put some Peanut Blossoms on the plate with Hershey Kisses scattered around.  Wrap with some clear or colored plastic wrap or use cellophane to wrap up around the plate and tie with a pretty Christmas ribbon at the top. 


Blog Design By: Sherbet Blossom Designs