Showing posts with label Chicken. Show all posts

Monday, October 24, 2011

Honey Chicken Stir Fry


There is nothing more satisfying than making Stir Fry dishes at home.  Don't get me wrong, I love Chinese take out but when you can make delicious dishes like this at home, skip the take out and serve your family a healthier, tasty meal.  

Chicken is a regular staple in my house.  But, I'm always wanting to try different chicken recipes.  Different flavors and cooking methods is what keeps things fresh and interesting.  Honey Garlic Chicken is one of my family's favorite  Chinese take out meals.  I found this Honey Chicken Stir Fry recipe on the food website Tasty Kitchen.  We all really enjoyed this dish.  I increased the recipe to  6 servings for the 4 of us and there was just enough left over for my husband to take for lunch the next day.  

***There are so many recipe resources and places for inspiration.  For more chicken recipe ideas, check out Reader's Digest chicken recipe section.***  


Honey Chicken Stir Fry

Servings: 6

Ingredients

4 large egg whites
2/3 cup cornstarch or flour (I used cornstarch)
3/8 cup olive oil (I used about 1/3 cup total)
1 1/2 - 2 cups broccoli florets
1 red bell pepper, thinly sliced
1 1/2 cups sugar snap peas (snow peas can be substituted)
1/8 cup soy sauce (I used 1/4 cup low sodium soy sauce)
2 cloves garlic, minced
1 1/2 - 2 lbs thin sliced, boneless, skinless chicken breasts
1/2 cup honey
salt and pepper

Preparation

Prepare and slice vegetables.  Place 4 egg whites in a small bowl and beat lightly. In another small bowl or plate, add cornstarch.  Heat a large skillet over medium-high heat and add 1 tablespoon olive oil.  Add vegetables to skillet and season lightly with salt and pepper.  Saute vegetables for about 5 minutes until softened.  Add soy sauce and garlic to veggies and stir until coated, about 1 minute.  Remove veggies from skillet and set aside.

Cut chicken into 1-inch pieces, season with salt and pepper.  Heat the same skillet over medium-high heat and add olive oil to coat pan.  Dip chicken pieces in egg whites and then lightly dredge in cornstarch.  Add chicken to the skillet in batches and let brown 2-3 minutes, then flip and brown other side.  When chicken is cooked, remove to plate and continue in batches until all the chicken is cooked.  Add some more olive oil to pan with each batch.

Once all the chicken is cooked place the chicken and the vegetables back in skillet.  Add honey and mix thoroughly to combine.  Taste and season with salt, pepper, additional honey or soy sauce, if needed.  Serve with rice.  (I used Jasmine Rice)

(Click here to print original recipe). You can change the serving size to your needs.

Disclosure:  This is a compensated post from Reader's Digest to highlight their chicken recipe site and to share their link with my readers.  All writings are my own thoughts and opinions.


Saute some healthy vegetables...broccoli, red pepper and sugar snap peas


Enjoy!

Mom's Cooking Club Lesson:  This dish has a couple of steps to it but you can make it easier on yourself. Cut your vegetables, measure your liquids and have your chicken cut up and coated before you begin the cooking process.  I try to have everything in the order I'm going to use them.  Stir frying is a pretty quick  cooking method so prepping ahead is always a good idea.

  
Share

Sunday, September 25, 2011

Grilled Chicken and Steak Fajitas......Featuring TortillaLand Tortillas


Have you ever heard or tried TortillaLand Flour Tortillas?  If not, I highly recommend that you see if your area sells them.  These are very different tortillas.  They are refrigerated and you make them fresh.  One of the TortillaLand's slogans is, "So Fresh They Haven't Even Been Made Yet".  


I was contacted to sample TortillaLand Flour Tortillas.  They asked if I would focus on a Back to School recipe.  My daughters started High School about a month ago.  We are extremely busy between work and school schedules.  I'm always looking for family friendly recipes that everyone will like.  


My daughters love tacos but I wanted to do something a little more interesting so I made Chicken and Steak Fajitas.  The great thing about Fajitas is that everyone can pick their favorite meat and toppings.  These were a huge hit.  The rub I used on the chicken and steak had wonderful flavor.  My daughters made their own Tortillas in a skillet since it only takes about 60 seconds.  The Tortillas taste so fresh.  We loved them!


Check out TortillaLand's website for their store locator.
http://www.tortillaland.com/where-to-buy/  


Stay up to date on Facebook (facebook.com/TortillaLand) and Twitter (@TortillaLand)


Go to http://www.tortillaland.com/ for recipe ideas, store locator and to enter their current giveaway where you could win 3 iPads!!!


Disclosure:  Representatives for TortillaLand Tortillas provided me samples and information but all thoughts and opinions are my own.  My entire family really like these tortillas.  Thank you TortillaLand!


Grilled Chicken and Steak Fajitas
Recipe by Jamie at Mom's Cooking Club

Ingredients

1 1/2 lbs beef sirloin steak
1 - 1 1/2 lbs boneless chicken breasts
1 tablespoon chili powder
1 teaspoon ground coriander
1 teaspoon coarse salt
1/2 teaspoon ground cumin
1/2 teaspoon garlic powder
1/2 teaspoon onion powder
1/2 teaspoon black pepper
2 limes

1 red bell pepper
1 green bell pepper
1/2 yellow onion

Topping ideas:  salsa, sour cream, diced avocado, shredded cheddar cheese. (Colby and Monterey Jack cheese are also good choices)

Directions

1.  Place the sirloin steak in a glass or nonreactive baking dish.  Place the chicken in a separate glass dish.  Combine the chili powder, coriander, salt, cumin, garlic and onion powders, and black pepper in a small bowl.  Mix well.  Rub this spice blend over the steak and chicken breasts.  Let stand for 10 minutes.  Squeeze the limes over the beef and chicken.  Marinate in the refrigerator for 30 minutes to 1 hour, covered.

2.  Cut bell peppers into strips.  Cut onion in slices.  Saute in skillet with a little olive oil until onions get tender and peppers get a little charred in spots.  Place in a serving dish.

3.  Grill steak until desired doneness and chicken until cooked through.  Let rest a few minutes.  Cut steak and chicken in strips and place on serving platter(s).

4.  Cook TortillaLand Flour Tortillas or warm other packaged tortillas.

5.  Place steak, chicken or both in center of tortillas.  Top with pepper and onion mixture.  Add favorite extra toppings as desired.  Fold up, eat and enjoy!


TortillaLand Flour Tortillas have just 5 simple ingredients: Wheat Flour, Water, Canola Oil, Salt and Sugar.


TortillaLand Flour Tortillas take about 60 seconds to cook. They will puff up as they cook and get lightly golden.


Sauteed Green Peppers, Red Peppers and Onions


The Fajita Spread.....Grilled Chicken and Steak, Peppers and Onions, Salsa, Shredded Cheese, Sour Cream, Avocado.  Serve with freshly made TortillaLand Flour Tortillas for a family friendly meal.

Enjoy!

Mom's Cooking Club Lesson: Does your grocery store carry TortillaLand Flour Tortillas?  If not, then take this Store Manager Product Request Form to your local store. 

My grocery store, Publix, does not carry TortillaLand Tortillas so I'm planning on taking this request form to my store manager.


Share

Sunday, July 31, 2011

Grilled Lemon Chicken Breasts


The lonely boneless chicken breast.  But so much possibility.  Pairing lemon with chicken is one such possibility.  Add some herbs and you have elevated the simple chicken breast into something so flavorful.  This is the perfect summer time meal.  Pair it with a salad or some veggies for a light and healthy dinner that everyone will enjoy. (my family did!)

Grilled Lemon Chicken Breasts
Recipe by Jamie, Mom's Cooking Club

Serves 4

Ingredients

4 boneless, skinless chicken breasts
3 tablespoons extra virgin olive oil
2 garlic cloves, minced or put through a garlic press
1/2 teaspoon dried thyme
1/2 teaspoon dried oregano
lemon juice from 1 lemon
lemon zest from 1 lemon
1/2 teaspoon kosher salt
1/2 teaspoon pepper

Directions

1. Place chicken breasts in a plastic storage bag or between 2 pieces of saran wrap or wax paper.  Using a meat mallet, pound to an even thickness but not too thin.

2. Mix the remaining ingredients in a small bowl and place in a large storage or freezer bag.  Add chicken breasts and seal the bag.  Rub and massage marinade  to evenly coat the chicken breasts.  Place the chicken in the refrigerator and let it marinade for at least 2 hours or up to 12 hours.  

3. Preheat grill to high.  Spray grill grates with cooking spray or rub with vegetable/canola oil.  Lower grill to medium heat.  Place chicken breasts on grill, close lid and cook for about 5 minutes per side.  Cook time will depend on thickness of chicken. 

Print Friendly and PDF


Enjoy!

Mom's Cooking Club Lesson:  I like to put my chicken breasts in a storage bag or between saran wrap and pound them to an even thickness.  Not real thin for this type of cooking but just enough where they have a more uniform thickness.  When I do this, I find that the chicken breasts cook more evenly as well as staying tender and moist.  


Share

Sunday, January 23, 2011

Chicken Piccata


Hello everyone!  I have a fantastic chicken recipe for you today.  But, I need to take care of some giveaway business first.


Cathy A. (comment #16 picked by Random.org)

**Please contact me Cathy with your address so I can pass on the information to MyBlogSpark who will send you your gift package.**


Don't you love when you make a meal and it tastes just as good (or better) than at a restaurant?  Well, for me, this was one of those meals.  This recipe came from the magazine, Cuisine at Home.  The chicken was tender and the lemon sauce gave this Chicken Piccata so much flavor.  I highly recommend you make this at home.  It has a few steps but it is not difficult to make.  Who needs to eat out when you can have a restaurant quality meal at home.  

Chicken Piccata
Recipe by Cuisine at Home, Complimentary issue


Ingredients

2 boneless, skinless chicken breasts, cut in half and pounded into cutlets
salt and black pepper
all-purpose flour
nonstick spray
2 Tbsp. vegetable oil
1/4 cup dry white wine
1 tsp. minced garlic
1/2 cup low-sodium chicken broth
2 Tbsp. fresh lemon juice
1 Tbsp. drained capers
2 Tbsp. unsalted butter
fresh lemon slices
chopped fresh parsley


Directions

1.  Season cutlets with salt and pepper, then dredge in flour.  Coat a saute pan with nonstick spray, add oil, and heat over medium-high.

2.  Saute cutlets 2-3 minutes on one side.  Flip cutlets over and saute the other side, covered, 1-2 minutes. Transfer cutlets to a warmed platter; pour off fat from the pan.

3.  Deglaze pan with wine and add minced garlic.  Cook until garlic is slightly brown and liquid is nearly evaporated, about 2 minutes.

4.  Add broth, lemon juice, and capers.  Return cutlets to pan and cook on each side for 1 minute.  Transfer cutlets to warm plates.

5.  Finish sauce with butter and lemons.  Once butter melts, pour sauce over cutlets.

6.  Garnish with chopped fresh parsley and serve immediately.

Makes: 2 servings (2 chicken cutlets per person) or 4 servings (1 chicken cutlet per person)

Note:  To increase this recipe, use 3 or 4 boneless chicken breasts, cut in half and pounded thin.  This will give you 6 - 8 chicken cutlets.  Double the remaining sauce ingredients so you have enough sauce for the extra chicken.    


Enjoy!

Mom's Cooking Club Lesson:  Tips per Cuisine at Home Magazine - Making chicken cutlets from boneless chicken breasts:  Cut chicken in half lengthwise before pounding.  Cover chicken pieces in plastic wrap or place in storage/freezer bag.  Using the flat side of a mallet, pound with gentle, glancing taps.  Use firm, quick movements until the chicken is about 1/4-inch thick.  The uniform chicken cutlets will brown evenly, be moist and tender, as well as cook up quickly. 

Monday, November 22, 2010

Ginger-Soy Chicken Thighs with Scallion Rice........The Kids Cook Monday!

Ginger Soy Chicken Thighs

I was feeling under the weather and the last thing I wanted to do was cook.  But I had some boneless, skinless chicken thighs in the fridge that needed to be cooked.  So, I thought my daughters (age 14) could make this simple chicken dish and I would just stand by and give them instructions. 

They made the rice.  Mixed in the sliced scallions.  Cooked the chicken in the skillet.  Made the sauce with apricot preserves, fresh ginger, soy sauce and garlic.  Cooked the sauce and coated the cooked chicken thighs in the sauce.  Placed the rice on a plate and put the glazed chicken thighs on top.  Added some string beans.  Dinner served.  Delicious.

Since this past August, my daughters have been helping me in the kitchen as part of The Kids Cook Monday program.  And I have seen some real changes in how they look at food.  They ask questions, they want to help and do more in the kitchen.  And the real plus is that they are trying more healthy and varieties of foods.  I could really get used to this Sous Chef thing.

For ideas on getting your kids to help more in the kitchen and to eat more family meals together, check out The Kids Cook Monday website.

My family wants to wish everyone a very Happy Thanksgiving!  Enjoy the time and food with your family, friends and loved ones. 


Ginger-Soy Chicken Thighs with Scallion Rice
Recipe by Cooking Light, November 2010, Slightly adapted

Yield: 4 servings (serving size: 2 thighs, about 1/2 cup rice, and about 1 1/2 tablespoons sauce)

Ingredients

4 servings of long-grain rice
2 tablespoons thinly sliced green onions
1 tablespoon olive oil
8 (2-ounce) skinless, boneless chicken thighs
1/2 cup apricot preserves
2 teaspoons grated peeled fresh ginger
2 tablespoons lower-sodium soy sauce
2 garlic cloves, minced

Preparation

1. Prepare rice according to package directions. Drain; fluff rice with a fork. Gently stir in green onions.

2. While rice cooks, heat a large skillet over medium-high heat. Add oil to pan; swirl to coat. Season chicken with a little salt and pepper.  Add chicken; cook 5 minutes on each side or until done. Remove from pan; keep warm. Add preserves, grated ginger, soy sauce, and garlic to pan; bring to a boil. Cook sauce 2 minutes or until reduced to 1/3 cup, stirring occasionally. Return chicken to pan; turn to coat with sauce.  Serve with rice.

Note: Original recipe calls for 1/2 cup ginger preserves.  You can substitute 1/2 cup apricot preserves plus 2 teaspoons grated peeled fresh ginger.


Ginger-Soy Chicken Thighs w/Scallion Rice


Enjoy!

Mom's Cooking Club Lesson:  If you need minced garlic in a recipe, a quick way is to run the peeled garlic clove over a Microplane Zester.  This was an easy and safe way for my daughter (or anyone) to mince the garlic needed for the ginger soy sauce. 

Monday, October 25, 2010

Chicken and Rice with The Kids Cook Monday!


I have a Monday recipe for you today that I know your family will enjoy.  I just love the combination of chicken and rice.  Such a comfort meal.  The mushroom rice mixture and the addition of Romano cheese on top of the chicken makes this meal so flavorful.  The carrots and mushrooms in the rice and using skinless bone-in chicken thighs keeps this dish healthier.  Give this recipe a try soon and start your week off in a healthy and satisfying way.


Chicken and Rice
Recipe by Cooking Light, October 2010

Serves 4

Ingredients

1 tablespoon olive oil
8 bone-in chicken thighs, skinned
3/4 teaspoon salt
1/4 teaspoon ground black pepper
2 cups chopped onion ( I used approx. 1 cup)
1 carrot, thinly sliced
8 ounces cremini (baby portabella) mushrooms, sliced
4 garlic cloves, minced
1 cup long-grain white rice
Cooking spray
1 cup fat-free, lower-sodium chicken broth
1/4 cup water
3 tablespoons heavy whipping cream
1/3 cup (1 1/2 ounces) grated fresh pecorino Romano cheese

Preparation

1. Preheat oven to 350°.
2. Heat oil in a skillet over medium-high heat. Sprinkle chicken with salt and pepper. Add 4 chicken thighs to pan; sauté 3 minutes on each side or until browned. Remove chicken from pan. Repeat with remaining chicken.
3. Add onion and carrot to pan; sauté 4 minutes. Add mushrooms; sauté 5 minutes. Add garlic; sauté 1 minute, stirring constantly. Add rice; sauté 1 minute. Spoon rice mixture into a 13 x 9-inch glass baking dish coated with cooking spray; stir in broth, 1/4 cup water, and cream. Arrange chicken over rice mixture; sprinkle with cheese. Bake at 350° for 45 minutes or until chicken is done.


My kids are busy in the kitchen.  Taking the stems off the mushrooms, browning the chicken and making the rice mixture.  Tips on getting your kids to help in the kitchen and to make Mondays (or any day) family night, check out The Kids Cook Monday website.  


The rice mixture is full of carrots and mushrooms which is started in a skillet before baking with the chicken. 


It may not be the most "pretty" food picture but it really, really does taste good.

Enjoy!

Mom's Cooking Club Lesson:  I don't shy away from recipes or cooking with ingredients I know my daughters don't like.  Take this Chicken and Rice for example.  My daughters do love chicken and they do love rice.  They, however, do not like mushrooms which is in the rice mixture.  They just picked out the mushrooms.  Funny thing is they loved the rice even though it was heavily flavored with mushrooms.  So, keep introducing the "I don't like that" foods to your kids.  Their likes and dislikes are always changing.  I have a feeling when my daughters get older, they will end up loving mushrooms.   

Monday, October 11, 2010

Chicken Tortilla Soup with The Kids Cook Monday!


Is it starting to get a little cooler where you live?  It's still warm here in Florida but we've been having cooler mornings and nights so I know our Fall weather will be here shortly.  It's the perfect time for soup (even though I love eating homemade soup anytime of the year). 

I thought this would be a great chance to try a new soup recipe for a healthy start to the week.  Make sure to check out the website for The Kids Cook Monday!  for tips and ideas on how to start your week off in a positive way.  

This soup is comforting and filling.  It's full of good for you ingredients and was enjoyed by all.  I recommend adding salt to taste and adding more chili powder or cayenne pepper if you like your tortilla soup a bit more spicy. 

I love discovering new blogs.  I get so many recipe ideas and inspiration.  This recipe comes from the blog, Skinny Kitchen.   Check it out for more ideas on making meals healthier.


Chicken Tortilla Soup
Slightly adapted, Recipe by Skinny Kitchen

5 - 6 servings

Ingredients

1 tablespoon plus 1 teaspoon extra virgin olive oil
1 ½ - 2 cups chopped onion
2 tablespoons chopped garlic
2 (6-inch) corn tortillas, chopped
2 tablespoons tomato paste
2 teaspoons paprika
1 teaspoons chili powder
1 teaspoon cumin 
⅛ teaspoon ground red pepper
6 to 6 1/2 cups reduced-sodium chicken broth
1 (15 oz) can diced tomatoes - I used fire-roasted tomatoes
1 (14 oz) can yellow hominy, drained and rinsed
1 (14 oz) can low sodium black beans, drained and rinsed
2 cups cooked chopped chicken - see cooking tip at bottom of post
Juice of one lime

Topping

1 ¼ cups tortilla chips, crushed
Shredded Cheddar cheese - optional

Instructions

1. In a large nonstick pot, add the olive oil, onions and garlic. Sauté for 1 minute.
2. Add the chopped tortillas, tomato paste, paprika, chili powder, cumin and cayenne pepper and sauté for 2 minutes.
3. Stir in the chicken broth and tomatoes. Bring up to a boil, turn down heat and simmer for 15 minutes.
4. Add the hominy, beans, chicken and fresh squeezed lime juice. Mix well. Cook 10 minutes more.
5. Garnish with shredded cheese and crushed tortilla chips.


I've never used Hominy before and honestly didn't know what it was.  Good time for a learning opportunity. So, Mariah looked it up on the internet. 

Per Recipetips.com, Hominy is:  "A corn product created by soaking white or yellow corn kernels in scalding water that is mixed with a chemical solution, such as a mild lye or slaked lime. The soaking forces the kernel to expand so the hull and germ split. This allows the kernel to be easily removed so that the remaining corn substance can be dried. After it has been dried, the whole kernels are soaked in water and a solution mixed with limestone or wood ash to expand the kernels, which are then boiled, creating a soft puffy food product referred to as Hominy.  Whole hominy can be boiled or fried and served as a side dish, with or without additional ingredients (meat, vegetables, or other foods), formed into cakes, or served as a filler in soups, stews and salads. Hominy grits are another form of hominy, produced by grinding the dried and processed corn kernels several times into a finer grained substance to be sold as fine, medium, or coarse textured hominy." 


The girls really helped me out in the kitchen today.  Marissa cut up the cooked chicken and helped pour in some of the ingredients like the beans and diced tomatoes.  Mariah sauteed the onions as I was busy prepping the other ingredients.


Enjoy!

Mom's Cooking Club Lesson:  Time saving tip for cooked chicken - Roast chicken breasts the night before or in morning.  Place in refrigerator.  You then have cooked chicken ready to use in your recipe that is moist, juicy and flavorful.  Directions:  Preheat oven to 450 degrees.  Use chicken breasts with bones and skin and place on baking sheet.  Drizzle some canola or olive oil over chicken and season with salt/pepper.  Place in top portion of oven and roast for 30 minutes or until chicken is cooked through.  Pull off skin and discard.  Shred or cut up cooked chicken as needed in your recipe. 

Monday, September 20, 2010

Herbed Parmesan Chicken Tenders with The Kids Cook Monday!


Welcome back to Monday and another segment of The Kids Cook Monday.  This program has been a great way for me to get my girls in the kitchen to help me prepare meals.  It has also been a learning experience as I teach them cooking skills and techniques.  We discuss the ingredients used and they have been asking me alot of questions about nutrition.

This is a fantastic way to make chicken tenders.  We all know how much kids love chicken tenders and nuggets.  We also know how some versions are not that great for you to eat.  These chicken tenders are marinated in buttermilk (I used low-fat) which keeps them tender and moist plus gives them great flavor.  They are breaded with a simple mixture of bread crumbs, Italian seasoning, salt and Parmesan cheese.  They are baked until golden brown and absolutely delicious.  We put ours on top a simple salad.

Another great meal we enjoyed together!  

I got inspiration from this recipe from Simply RecipesClick here for the original recipe.


Herbed Parmesan Chicken Tenders
Recipe by Jamie at Mom's Cooking Club
Ingredients

2 lbs chicken tenders (I used 2 packages which was 18 tenders)
1 1/2 cups low-fat buttermilk
1 cup dry plain bread crumbs
2 Tbsp Italian seasoning
1/2 teaspoon salt
1/4 cup grated Parmesan cheese
Canola oil
2 Tbsp butter, melted

Directions

Soak chicken tenders in buttermilk for 15-30 minutes.
Mix together the breadcrumbs, Italian seasoning, salt and Parmesan cheese in a plate or bowl.
Heat oven to 500°F. Line a baking sheet with foil. Brush the top of the foil with canola oil to help prevent sticking.
Remove the chicken tenders one at a time from the buttermilk and place in the bowl with the breadcrumbs, coating all sides with the breadcrumbs. Place on the baking sheet.
Drizzle the melted butter over the chicken tenders. Place in the oven and bake for about 12 - 14 minutes, until the chicken is cooked through, and the pieces are lightly browned.


A simple preparation: chicken tenders marinate in buttermilk for 15-30 minutes, then coated in the bread crumb mixture, placed on a baking sheet and drizzled with a little butter.  In 12-14 minutes, out comes the most moist and tasty chicken tenders. 


A simple salad of mixed iceberg and romaine lettuce, cucumbers, shredded carrots, feta cheese and dried cranberries.

Me (Jamie) and the dogs (MJ & Maximus) are supervising Marissa as she 
grates the Parmesan cheese.


Enjoy!

Mom's Cooking Club Lesson:  We put these chicken tenders on top of a salad with light ranch dressing.  Light blue cheese or honey mustard dressing would be delicious as well.  Or serve the tenders separately with a side of veggies.

Monday, September 13, 2010

The Kids Cook Monday with Soft Black Bean Tostadas

Black Bean Tostadas

It's Monday again and that means it's time for The Kids Cook Monday!  My girls got in the kitchen with me to make these "oh so yummy" Black Bean and Chicken Tostadas.  We had fun making these tostadas because we each got to "build" our own with our topping choices.  My husband and I loved the salsa with the fresh tomatoes, avocado, green onions and lime juice.  For convenience, we used rotisserie chicken.  This was a great family dinner that we all enjoyed.   

So, as The Kids Cook Monday program says, "Start your week off right: make Monday family night!  Easy to do with a family friendly and healthy recipe like these Soft Black Bean Tostadas.     

This recipe is from Cooking Light.  Click here for the printable recipe on Myrecipes.com.


I had other helpers in the kitchen today.  Say hi to Maximus and MJ!


The bean spread was easy and quick to prepare in my mini food processor.  A very good bean spread that would be great as a bean dip too.


The girls ate it burrito style. 

Enjoy!

Mom's Cooking Club Lesson:  There are many variations you could do with this recipe.  You could leave the chicken off and go for meatless tostadas.  You could brown some lean ground beef with taco seasoning or saute/grill some shrimp instead of chicken.  You could also use whole wheat tortillas to make it even healthier.   

Thursday, May 27, 2010

Beer Can Chicken

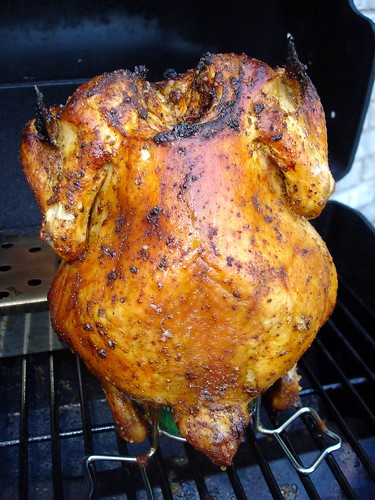
The first time I had Beer Can Chicken was last summer while visiting my brother, Larry and sister-in-law, Aggie.  I don't know why I waited a year to make it myself.  This is such a fun and delicious way to make chicken on the grill.  It turned out super good.  Give it a try this Memorial Day weekend or during the summer.  It will make a great presentation for your family and friends.  

The recipe I followed was from Steven Raichlen's cookbook, How to Grill, The Completed Illustrated Book of Barbecue Techniques.  My mother-in-law gave us this book years ago and it's an excellent all-around barbecue cookbook.  


See below for the Barbecue Rub recipe and some of my tips with preparing and cooking this chicken.


I used the Basic Barbecue Rub from the How to Grill Cookbook.  I make a batch and keep it in an airtight container.  It's a great barbecue rub to use on a variety of meats and seafood.

Basic Barbecue Rub
Recipe from Steven Raichlen’s How To Grill cookbook

1/4 cup (packed) dark brown sugar
1/4 cup paprika
3 tablespoons black pepper
3 tablespoons coarse salt (I used Kosher)
1 tablespoon hickory-smoked salt or more coarse salt
2 teaspoons garlic powder
2 teaspoons onion powder
2 teaspoons celery seeds
1 teaspoon cayenne pepper

Combine all the ingredients in a bowl and stir or whisk to mix. Transfer to an airtight jar or container and store away from heat and light. The rub will keep for at least 6 months.

Makes 1 cup

Tips:  Use a 12 oz can of beer.  Pour half out (you can drink it of course or use it along with water to soak your wood chips, if using).  I put 2 teaspoons of the barbecue rub in the beer.  I put 2 heaping teaspoons of the rub in the body and neck cavities of the chicken.  I rubbed canola oil on the outside of the chicken and then applied about 3 teaspoons of the rub all over the outside of the chicken.  

I bought a Beer Can Chicken holder at Lowes for a few dollars and it worked great.  There were no worries that the chicken was going to fall over.  I also used a wood chip smoking box that I also purchased at Lowes along with a bag of Apple wood chips.  I have a gas grill and I've never used the wood chips but always wanted to try them.  I soaked about 4 handfuls of the wood chips for at least 30 minutes.  You place them in the smoking box and place on the heated grill for about 10 minutes until it gets really smoking.  Then you put the chicken on the grill on the side with no burner on. (this will keep it from burning)  You keep the other side burner on and close the lid.  You may not think the chicken will cook but it does.  It takes about 1 1/4 hours but I recommend checking the temperature at 1 hour.  It should be about 180 degrees when inserted in the thigh.  It smelled incredible.  I'm sure all my neighbors were jealous : ) 

Let it rest for at least 5 minutes before taking it off the beer can.  My husband used tongs placed under the chicken to pull it carefully off the beer can.


This chicken was close to 4 1/2 lbs and it was ready in about 1 hour and 10 minutes.  See how the Beer Can holder works and keeps that chicken steady.  You can also see the smoking box in the back of the grill.  I loved using the wood chips.  It gave the chicken an extra flavor to it and it wasn't overly smoked at all.  I can't wait to try some other wood chips like hickory and mesquite.


Enjoy!

Mom's Cooking Club Lesson:  You can vary your can with root beer, cola or lemon lime soda.  You can also use your own favorite barbecue rub.     

Tuesday, May 18, 2010

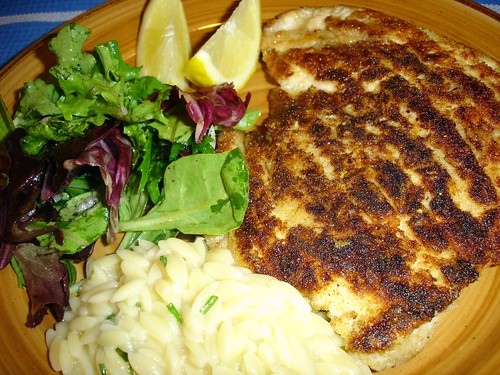
Dinner is served.....Chicken Milanese with Spring Greens and Parmesan-Browned Butter Orzo


If you read my blog, you know I like to make many recipes from Cooking Light magazine and their website.  There's a section in their magazine called Dinner Tonight which gives recipes for an entire meal.  The recipes usually take 30 or 40 minutes to make.  This meal plan is in their May 2010 magazine edition.

This is one of those family pleasing, family happy meals.  At least in my house it was.  The chicken was so flavorful and tender.  And it's pan seared in a little olive oil.  I did add a little extra olive oil when browning the other side of the chicken and for the 2nd batch.  The chicken went perfect with the orzo side dish.  And the light lemony salad dressing was the perfect complement to the whole meal.  This is a dinner that I know I will make again.

Note:  I did double the chicken recipe ingredients because the recipe listed is for 2 servings and I needed 4 servings.

Click here for the Chicken Milanese with Spring Greens recipe 

Click here for the Parmesan-Browned Butter Orzo recipe

Note:  The orzo recipe posted has a typo.  The recipe ingredient list has 1 1/4 cups of chicken broth but the instructions say to use 1 cup chicken broth.  You actually use 1 1/4 cup chicken broth.


Dinner is served!

Enjoy!

Mom's Cooking Club Lesson:  You want the chicken breasts to be thin so to make it easier to pound thin, I butterfly (cut) the boneless chicken breasts in half, longways, but not all the way through. You open it up and you have a very large chicken breast. I pounded the butterflied chicken breast to about 1/2 inch thickness. It is much easier to pound it thin like this then starting with the whole thick chicken breast. You can buy the thin sliced chicken breasts but I find them to be too thin sometimes.
 
Blog Design By: Sherbet Blossom Designs