Showing posts with label Candy. Show all posts

Thursday, October 20, 2011

Snickers Brownies.......Week 4 of the 12 Weeks of Christmas Cookies


Ever since I made these Peanut Butter Cup Brownie Bites, I've been obsessed with adding candy to my baked goods.  I was going to make Snickers Cookies (yes there is such a thing), but due to time constraints, I needed to do something that would be be quicker.  So, I googled Snickers Brownies and found this recipe by My Baking Addiction.  


How do I describe these?  Decadent. Rich. Chocolaty. Fudgy. 


Was it a good idea to add Snickers Bars to brownies?


Oh YES!


I know this is a little different for a Christmas treat but I don't think anyone would mind if these showed up on your cookie platter this year.   

Snickers Brownies

yield | 12 brownies

Ingredients

4 ounces unsweetened chocolate; coarsely chopped
3/4 cup butter, unsalted
1 ½ cups white sugar
3 eggs; lightly beaten
1 teaspoon vanilla extract
¼ teaspoon kosher salt
1 cup all-purpose flour
12 Fun Size Snickers Candy Bars; cut into fourths (I used 10 Snickers)

Directions

1. Preheat oven to 350 degrees. Line an 8×8 inch baking pan with foil and spray with nonstick cooking spray.
2. Microwave chocolate and butter in large bowl at medium (50% power) for 3-4 minutes or until butter is melted.
3. Whisk until chocolate is melted. Stir in sugar. Add in eggs, extract and salt. Gradually add in flour and stir until just combined.
4. Spread ½ the batter into prepared pan. Add an even layer of Snickers and cover with remaining ½ of brownie batter. Bake for 30-35 minutes; do not over bake.
5. Remove to cooling rack. Cool completely before cutting.


The hidden special ingredient in these brownies.  All I can say is WOW!


Lining the pan with foil makes it easy to lift out of the baking pan and cut into squares.


It's Week 4 and I'm working my way through the 12 Weeks of Christmas Cookies.  See the blog hop below for more shared holiday treats.

Enjoy!

Mom's Cooking Club Lesson:  Snickers candy bars have been around a long time.  They were introduced by Mars, Incorporated in 1930.  A candy bar that stays around for 81 years has to be pretty special.  Roasted peanuts, nougat, caramel and milk chocolate.....Snickers!


Share


Thursday, October 6, 2011

Peanut Butter Cup Brownie Bites.....Week 2 of the 12 Weeks of Christmas Cookies


Is it a brownie?  Is it candy?  It's a combination.  Candy inside a brownie bite.  Oh my!  This is some serious goodness.  It's Week 2 of the 12 Weeks of Christmas Cookies.  This week I decided to make brownies instead of cookies.  There's plenty of room for a variety of goodies on your holiday cookie tray.    

 Reese's Peanut Butter Cups are one of my favorite candies.  One of my favorite desserts are brownies.  Put the 2 together and I'm pretty much in heaven.  These are super easy to make and fun too!  

Peanut Butter Cup Brownie Bites
Recipe by Savory Sweet Life

Yield: Approx. 40 Brownie Bites

Ingredients

3/4 cup butter, melted
3/4 cup white sugar
3/4 cup light brown sugar, packed
2 teaspoons vanilla extract
2 eggs
3/4 cup all-purpose flour
1/2 cup unsweetened cocoa powder
1/2 teaspoon salt
40 miniature Reese's Peanut Butter Cups, unwrapped


Directions

Preheat oven to 350 degrees.  Spray mini cupcake pan(s) with non stick spray. In a medium bowl, mix melted butter, sugars and vanilla.  Beat in eggs one at a time.  Add flour, cocoa and salt.  Mix until combined.  Fill each cupcake section with batter, slightly more than halfway.  Do not overfill.  Place a peanut butter cup in each cupcake hole, pressing it down until it is almost level with the batter.  Bake in preheated oven for 15-18 minutes or until done.  Cool the brownie bites for 5 minutes before removing from the cupcake tin.  

Note: Thanks to Alice from the blog Savory Sweet Life for this recipe.

(Go here to print recipe)


My daughter, Marissa, unwrapped all the candy for me and placed then in the batter.  What a great recipe for your kids to help make.


See the blog hop link below for some more wonderful cookie/treat recipes from other bloggers.


Enjoy!

Mom's Cooking Club Lesson:  I had a hard time getting out some of the brownie bites.  Some broke as I tried to remove them.  I may have overfilled the muffin cups.  Next time I will use mini muffin liners.  I think that will solve the problem.  But no worries....we enjoyed eating the warm broken ones.  They didn't go to waste.


Share


Sunday, February 13, 2011

Oreo Truffles


Oreo Cookies, Cream Cheese and Melted Chocolate = Oreo Truffles

A simple, fun and scrumptious treat to make for your family and friends.  I had these for the first time during Christmas when the mother of my daughters friend made them and kindly shared them with us.  Then, recently, I saw the recipe posted by The Naptime Chef on Babble.com.  I wanted to make a Valentine's Day treat for my family and co-workers and this was the perfect choice.  You bite into the chocolate candy coating and what do you get?  A truffle like center that is rich, soft and with an Oreo chocolate flavor. 

I made one batch with regular Oreo cookies and another batch with mint Oreos.  I coated the Oreo centers with white chocolate and regular chocolate.  I switched up the toppings: pink sugar and drizzled white chocolate.  I kept some of them plain chocolate as well.  The variations are endless.  Have fun and use your imagination.    

Oreo Truffles
Recipe inspired by The Naptime Chef

Ingredients

8 ounces cream cheese  (I used light cream cheese)
1 package Oreos (any flavor)  (I made one batch with mint, one batch with regular oreos)
4 ounces white chocolate, or semisweet chocolate, melted  (I used Ghirardelli Candy Making & Dipping Bar)

Directions

1. Place the cookies in a food processor and pulse until they are fine crumbs. Add the cream cheese and pulse again until a sticky dough forms. Use your hands to form the dough into 1″ round balls and place them on a cookie sheet lined with wax paper. Place them in the fridge to chill for at least 2 hours or up to 1 day.

2. Melt the chocolate in a double boiler or in the microwave. Roll the chilled truffles in the chocolate until they are completely coated. If desired, add colored sugar before chocolate starts to dry or drizzle with different color chocolate. Place them back on the lined cookie sheet. Chill them in the refrigerator until they are set, about 1 more hour.

3. For a cute presentation, place in mini baking cups or candy liners.  Store in refrigerator.


Oreo Truffle with Chocolate Coating, drizzled with White Chocolate


Oreo Truffle with White Chocolate, sprinkled with Pink Sugar

Happy Valentine's Day!!!!

Enjoy!

Mom's Cooking Club Lesson:  Variations - you can make these Oreo Truffles all year round and match the sprinkles and mini baking cups to any holiday or celebration.  You can make some for Easter with pastel colors, 4th of July with a red, white and blue theme, Halloween you can do black, purple and orange. And of course for Christmas you can do red and green.  Have fun with these throughout the year!

Sunday, December 12, 2010

Chocolate Walnut Fudge.......12 Weeks of Christmas Cookies: Week 11


How about some chocolate fudge on your cookie trays this year?  You have to have some chocolate around the holiday season and what better way than with homemade fudge.  Quick and easy to make which is perfect during the last hectic weeks of Christmas.      


Chocolate Walnut Fudge
Recipe by Anne Thornton from Food Network

Ingredients

2 cups semisweet chocolate chips
1 cup milk chocolate chips
1 (14-ounce) can sweetened condensed milk
1/4 teaspoon fine sea salt
1 cup chopped nuts, optional, (recommended: toasted, salted walnuts)
1 1/2 teaspoons vanilla extract

Directions

In a heavy bottom saucepan over low heat, melt the chocolate chips with the sweetened condensed milk and the salt. Remove from the heat, stir in the nuts, if using, and the vanilla. Spread evenly into a foil-lined 8 or 9-inch square pan. Chill for 3 hours, or until firm. Remove the fudge from the pan and place onto a cutting board. Remove the foil from the bottom of the fudge and cut into squares. Store, covered, in the refrigerator or freezer.

Note:  I used chopped walnuts but did not toast them.  I stored my fudge in the refrigerator.  I recommend eating the fudge at room temperature. 


Enjoy!

Mom's Cooking Club Lesson:  Gift/Packaging Idea -  Package your fudge in a cute box or container.  You can get boxes like the one above at Target, Michaels or a variety of craft and kitchen stores. 


Saturday, November 27, 2010

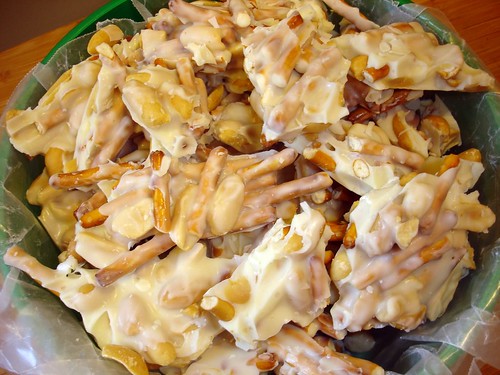
Pretzel Peanut Bark.........12 Weeks of Christmas Cookies: Week 9

Pretzel Peanut Bark

I hope everyone had a nice Thanksgiving.  Now the countdown to Christmas begins.  During this busy time, it's hard to find the time to make home baked cookies and treats.  This Pretzel Peanut Bark is perfect for this time of year.  It's easy, quick, only 3 ingredients and you won't be able to just eat one piece.  It's sweet, salty, crunchy and creamy.  So, put aside a little time this holiday season and make this homemade treat.  You will be thanked for it!


Peanut Pretzel Bark
Recipe by Paula Deen


Ingredients

18 (1-ounce) squares white chocolate (I used Ghirardelli Candy Making & Dipping Bar)
3 cups skinny pretzel sticks, broken into small pieces but not crushed, then measured
2 cups dry salted peanuts (I used Cocktail peanuts)

Directions

Line a rimmed cookie sheet with parchment or waxed paper.

Melt the chocolate in a double boiler over simmering water until smooth, or melt in the microwave in a 2 quart glass dish. Microwave on high (100 percent) for 1 minute, stir, and microwave on high for 1 minute more. If necessary, microwave on high for 10 seconds more, and stir until the chocolate is melted and smooth. Stir in the pretzel pieces and peanuts. Stir well with a flexible spatula.

Spoon onto the prepared cookie sheet, spreading the mixture out so that ingredients are relatively evenly distributed.

Allow for the chocolate to cool for several hours or refrigerate for about 45 minutes, until firm. Break the bark into irregular pieces, like peanut brittle. Store in cookie tins, or package in Chinese food take-out cartons lined with waxed paper.


Spread mixture of pretzel sticks, peanuts and melted white chocolate on cookie sheet.  The bark will harden quickly in the refrigerator.


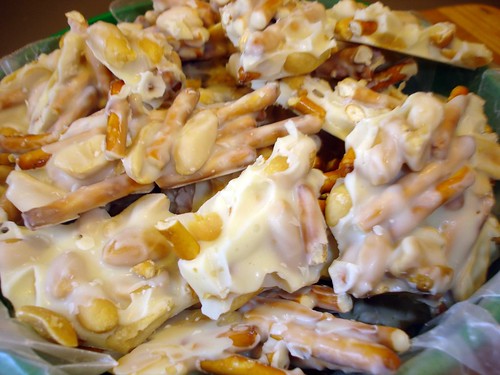
Close-up Pretzel Peanut Bark

Enjoy!


Mom's Cooking Club Lesson:  Gift/Packaging Idea - I found these cute little Christmas tin buckets and treat bags in the $1.00 bin section at Target.  Place some Pretzel Peanut Bark pieces in treat bag and secure with twist tie.  Place in containers and share with teachers, neighbors, friends and relatives.  A treat made and packaged by you will bring such happiness to others.


Blog Design By: Sherbet Blossom Designs