Showing posts with label 12 Weeks of Christmas Cookies. Show all posts

Sunday, November 13, 2011

Caramel Corn........Week #7 of the 12 Weeks of Christmas Cookies


I'm a little late this week getting my post up for The 12 Weeks of Christmas Cookies.  But here it is.  Not a cookie but a sweet snack worthy for any Christmas tray or Christmas food gift.  

I just love, love, love caramel corn.  Much of my childhood was growing up in Ocean City, MD and one of my favorite childhood memories is eating Fisher's Popcorn from the boardwalk.  Making your own caramel popcorn at home is easy.  Your family and friends would love to get a container of this classic favorite.  I guarantee they will ask for more.


Caramel Corn
Recipe slightly adapted from Better Homes and Gardens Cookbook

Ingredients

7 to 8 cups popped popcorn
3/4 cup packed brown sugar
6 tablespoons butter
3 tablespoons light-colored corn syrup
1 teaspoon baking soda
1 teaspoon vanilla

Directions

1. Put popped popcorn into a 17x12x2 inch baking pan. (such as a large rimmed cookie sheet) 
2. To make caramel mixture, in a medium saucepan combine brown sugar, butter and corn syrup.  Cook and stir over medium heat until mixture boils.  Continue boiling at a moderate, steady rate, without stirring, for 5 minutes more.
3.  Remove saucepan from heat.  Stir in baking soda and vanilla.  Pour caramel mixture over popcorn; stir gently to coat.  Bake in a 300 degree oven for 15 minutes.  Stir mixture and bake 5 minutes more.  Remove from oven and allow to cool.  Store tightly covered for 1 week.


Make a foodie gift: package your popcorn in a Christmas themed box or container.  They may just return it for a refill.


The blog hop is below.  For more great cookie and treat ideas, check out the individual links below.


My husband decided to sneak a few pieces as I was trying to take my photos.  He has a huge sweet tooth and is really benefiting from all my baking.

Enjoy!

Mom's Cooking Club Lesson:  I used about 1 and a half bags of popped microwave popcorn.  Use any type of popcorn you like to make.      



Share

Friday, November 4, 2011

Chocolate Chip Macadamia Nut Cookie Bars.......Week 6 of the 12 Weeks of Christmas Cookies


It has been such a busy crazy time for me.  I'm sure many of you can relate.   But I still had time to bake something this week.  It needed to be quick and it needed to be easy.  But it still had to be a yummy dessert.  You will find it in these Chocolate Chip Cookie Bars.  The addition of Macadamia nuts elevates it to something extra special and extra delicious.  


Chocolate Chip Macadamia Nut Cookie Bars
Recipe by Ghirardelli

Yield: 16 bars

Ingredients

12 ounces Semi-Sweet Chocolate Chips
1 cup butter, softened (2 sticks)
1 1/2 cups brown sugar, packed
2 teaspoons vanilla
2 large eggs
1 1/2 cups all-purpose flour
1 1/2 teaspoons baking powder
1 teaspoon salt
1 cup macadamia nuts, coarsely chopped

Directions


Preheat oven to 325 degrees.  In a large bowl, beat butter with brown sugar at medium speed until light and fluffy.  Add vanilla and eggs.  Add eggs one at a time, mixing on low speed until combined.  Combine flour, baking powder and salt in a small bowl.  Gradually add to egg mixture while mixing on low speed.    Fold in chocolate chips and macadamia nuts.  Spread batter evenly into a 13" x 9" pan. (I suggest spraying lightly with cooking spray)


Bake for 25 to 30 minutes or until wooden pick inserted in center comes out clean. Cool completely in pan on wire rack.  Cut into squares.


It's Week 6 of the 12 Weeks of Christmas Cookies.  Halfway there.  For more ideas, see what other bloggers are baking up with the blog hop below.


Enjoy!

Mom's Cooking Club Lesson:  When you want to bake homemade cookies but pressed for time, try making cookie bars.  One pan and less work with all the delicious flavor of freshly baked cookies.


Share

Thursday, October 27, 2011

Lemon Icebox Cookies........Week 5 of The 12 Weeks of Christmas Cookies


After my rich and decadent holiday dessert last week, I wanted to make  something a little lighter this week.  I'm not sure if you can call a butter cookie "lighter" but it sounds good to me.

Ice Box Cookies (aka Refrigerator Cookies) are basically shortbread cookies that are usually rolled into logs, refrigerated and then sliced and baked.  This dough made 3 logs.  I sliced and baked 2 of them 1 day and then used the 3rd one the next day.  This dough can be frozen for up to 2 months which is perfect to make ahead of time.  You can then thaw out the dough and bake it around the holidays.

These cookies were not "pucker your lips" with lemon flavor.  They had a hint of lemon and were on the crunchy side.  Very good butter cookie that went perfect with a cup of hot tea.  

Make sure to check out the blog hop below for more cookie and treat ideas.


Lemon Icebox Cookies
Recipe by Southern Living


Ingredients

1 cup butter, softened
1 cup granulated sugar
1 cup firmly packed light brown sugar
2 large eggs
1 teaspoon grated lemon rind
2 tablespoons fresh lemon juice
3 1/2 cups all-purpose flour
1 teaspoon baking soda
1/2 teaspoon salt

Preparation

Beat butter and sugars at medium speed with an electric mixer until fluffy.  Add eggs, 1 at a time, beating well after each addition.  Add grated lemon rind and lemon juice, beating until blended.

Combine flour, baking soda and salt.  Gradually add to butter mixture and beat just until blended.

Divide dough into 3 equal portions.  Roll each portion to a 12 inch log and wrap in wax paper.  Place in refrigerator and chill 8 hours.

Cut each log into 1/2 inch slices (about 28 slices) and place on lightly greased baking sheets.  

Bake at 350 degrees for 12-14 minutes or until edges are lightly browned.  Remove to wire racks to cool.  Store cookies in an airtight container.

Note:  I made the cookie dough in the morning and placed the dough logs in the refrigerator.  Later that day, I sliced and baked the cookies.  Fresh cookies for an evening treat.


What surprise hides inside?


Lemon Icebox Cookies!!!

Mom's Cooking Club Lesson:  Part of the fun of giving cookies and holiday treats is the packaging.  I got these cute Holiday Take Out containers at Michaels last year.  Your local craft store will have so many ideas.  Make it festive, make it fun!  


Share

Thursday, October 20, 2011

Snickers Brownies.......Week 4 of the 12 Weeks of Christmas Cookies


Ever since I made these Peanut Butter Cup Brownie Bites, I've been obsessed with adding candy to my baked goods.  I was going to make Snickers Cookies (yes there is such a thing), but due to time constraints, I needed to do something that would be be quicker.  So, I googled Snickers Brownies and found this recipe by My Baking Addiction.  


How do I describe these?  Decadent. Rich. Chocolaty. Fudgy. 


Was it a good idea to add Snickers Bars to brownies?


Oh YES!


I know this is a little different for a Christmas treat but I don't think anyone would mind if these showed up on your cookie platter this year.   

Snickers Brownies

yield | 12 brownies

Ingredients

4 ounces unsweetened chocolate; coarsely chopped
3/4 cup butter, unsalted
1 ½ cups white sugar
3 eggs; lightly beaten
1 teaspoon vanilla extract
¼ teaspoon kosher salt
1 cup all-purpose flour
12 Fun Size Snickers Candy Bars; cut into fourths (I used 10 Snickers)

Directions

1. Preheat oven to 350 degrees. Line an 8×8 inch baking pan with foil and spray with nonstick cooking spray.
2. Microwave chocolate and butter in large bowl at medium (50% power) for 3-4 minutes or until butter is melted.
3. Whisk until chocolate is melted. Stir in sugar. Add in eggs, extract and salt. Gradually add in flour and stir until just combined.
4. Spread ½ the batter into prepared pan. Add an even layer of Snickers and cover with remaining ½ of brownie batter. Bake for 30-35 minutes; do not over bake.
5. Remove to cooling rack. Cool completely before cutting.


The hidden special ingredient in these brownies.  All I can say is WOW!


Lining the pan with foil makes it easy to lift out of the baking pan and cut into squares.


It's Week 4 and I'm working my way through the 12 Weeks of Christmas Cookies.  See the blog hop below for more shared holiday treats.

Enjoy!

Mom's Cooking Club Lesson:  Snickers candy bars have been around a long time.  They were introduced by Mars, Incorporated in 1930.  A candy bar that stays around for 81 years has to be pretty special.  Roasted peanuts, nougat, caramel and milk chocolate.....Snickers!


Share


Thursday, October 13, 2011

Molasses Cookies......Week #3......12 Weeks of Christmas Cookies


Molasses Cookies!!!!  These are a wonderful Christmas cookie.  But they are the ultimate Fall cookie.  This spice cookie uses cinnamon, ginger, cloves, molasses and dark brown sugar.  What a perfect flavor combination.  The smells that will fill your kitchen will put you in a happy mood.  They are chewy with a light sugar coating.  I really can't stop thinking about these cookies.  A great idea for your Christmas cookie platter but an even better idea is to make them now for your Fall baking.

Molasses Cookies
Recipe by Joy of Baking

Yield: about 3 dozen cookies

Ingredients

2 cups all purpose flour
1 teaspoon baking soda
1/4 teaspoon salt
1 teaspoon ground cinnamon
1 teaspoon ground ginger
1/2 teaspoon ground cloves
1/2 cup unsalted butter, room temperature
1 cup dark brown sugar
2 tablespoons vegetable or canola oil
1/3 cup unsulphured molasses (I used Grandma's Original Molasses)
1 large egg
1/2 teaspoon pure vanilla extract
1/2 cup granulated white sugar (for garnish)

Directions

1. In a large bowl, sift or whisk the flour, baking soda, salt and spices.
2. Beat the butter and brown sugar with an electric mixer until light and fluffy. (about 2-3 minutes)
3. Add the oil, molasses, egg and vanilla extract and beat until mixed.  
4. Beat in the flour mixture until well incorporated.  Cover and chill the batter until firm. (about 2 hours or overnight)
5. After the dough has chilled, preheat the oven to 375 degrees.  Line baking sheet(s) with parchment paper.
6. Place 1/2 cup white sugar in a small bowl.  Add more sugar if needed.  Roll chilled dough into 1 inch balls.  Then roll the balls of dough into the sugar, coating them all around.  Place on the baking sheet about 2 inches apart.  With the bottom of a glass, flatten the cookies slightly.  
7. Bake for about 9-10 minutes or until the tops of the cookies have crinkles and will look a little underdone.  Remove from oven and cool on a wire rack.  Store in an airtight container for up to a week.


These cookies are so addicting.  I bet you just can't eat one.
  

More cookie recipes are below in the blog hop.  Keep checking back as additional people join.  You will have plenty of ideas and recipes for your Holiday baking this season.


Enjoy!

Mom's Cooking Club Lesson:  What is molasses?  It's the dark, sweet, syrupy byproduct that you get with the extraction of sugars from sugarcane, sugar beets and grapes.  It is created when the juices from these products are processed.  There is sulphured and unsulphured molasses.  Sulphured molasses has been treated with sulfur dioxide as a preservative.  Unsulphured molasses, which is used in these cookies, has a lighter, cleaner sugar flavor.    


Share

Thursday, October 6, 2011

Peanut Butter Cup Brownie Bites.....Week 2 of the 12 Weeks of Christmas Cookies


Is it a brownie?  Is it candy?  It's a combination.  Candy inside a brownie bite.  Oh my!  This is some serious goodness.  It's Week 2 of the 12 Weeks of Christmas Cookies.  This week I decided to make brownies instead of cookies.  There's plenty of room for a variety of goodies on your holiday cookie tray.    

 Reese's Peanut Butter Cups are one of my favorite candies.  One of my favorite desserts are brownies.  Put the 2 together and I'm pretty much in heaven.  These are super easy to make and fun too!  

Peanut Butter Cup Brownie Bites
Recipe by Savory Sweet Life

Yield: Approx. 40 Brownie Bites

Ingredients

3/4 cup butter, melted
3/4 cup white sugar
3/4 cup light brown sugar, packed
2 teaspoons vanilla extract
2 eggs
3/4 cup all-purpose flour
1/2 cup unsweetened cocoa powder
1/2 teaspoon salt
40 miniature Reese's Peanut Butter Cups, unwrapped


Directions

Preheat oven to 350 degrees.  Spray mini cupcake pan(s) with non stick spray. In a medium bowl, mix melted butter, sugars and vanilla.  Beat in eggs one at a time.  Add flour, cocoa and salt.  Mix until combined.  Fill each cupcake section with batter, slightly more than halfway.  Do not overfill.  Place a peanut butter cup in each cupcake hole, pressing it down until it is almost level with the batter.  Bake in preheated oven for 15-18 minutes or until done.  Cool the brownie bites for 5 minutes before removing from the cupcake tin.  

Note: Thanks to Alice from the blog Savory Sweet Life for this recipe.

(Go here to print recipe)


My daughter, Marissa, unwrapped all the candy for me and placed then in the batter.  What a great recipe for your kids to help make.


See the blog hop link below for some more wonderful cookie/treat recipes from other bloggers.


Enjoy!

Mom's Cooking Club Lesson:  I had a hard time getting out some of the brownie bites.  Some broke as I tried to remove them.  I may have overfilled the muffin cups.  Next time I will use mini muffin liners.  I think that will solve the problem.  But no worries....we enjoyed eating the warm broken ones.  They didn't go to waste.


Share


Thursday, September 29, 2011

The Countdown Begins.....12 Weeks of Christmas Cookies 2011


Did I say Christmas Cookies?  12 Weeks of Christmas Cookies?  I know what you are thinking.....how can I be thinking of Christmas when we are just barely out of summer.  Well, this time of year flies by and before you know it, the holidays will be here.  

Last year I participated in the 12 weeks of Christmas Cookies hosted by April from Abby Sweets.  This year I am participating again and it will be hosted by Brenda from Meal Planning Magic.  I hope to share a cookie or treat every week, depending on my schedule.  There will be a blog hop at the end of my post so you can see what others have made.  What a great way to share recipes and hopefully will inspire you to bake some sweet treats for the holiday season.

My first recipe is the classic chocolate chip cookie.  Every holiday cookie plate has to have chocolate chip cookies.  My go to recipe has always been Nestle Toll House Cookies.  But, I'm always game to try different chocolate chip cookie recipes.  This cookie comes from Tate's Bake Shop Cookbook.  It's a thin cookie.  Crusty on the edges but also buttery and chewy.  A really good chocolate chip cookie to share with family and friends.  But then again, have you ever had a chocolate chip cookie you didn't like.  Give this one a try.  I think you'll see them disappear. 
Chocolate Chip Cookies

Ingredients

2 cups all-purpose flour
1 teaspoon baking soda
1 teaspoon salt
1 cup unsalted butter, softened (original recipe calls for salted butter)
3/4 cup sugar
3/4 cup firmly packed dark brown sugar
1 teaspoon water
1 teaspoon vanilla
2 large eggs
2 cups semisweet chocolate chips

Directions

Preheat the oven to 350 degrees.  Grease cookie sheet(s) or line with Silpat.
In a large bowl, stir together the flour, baking soda and salt.  
In another large bowl, cream the butter and sugars.  Add the water and vanilla.  Mix the ingredients until they are just combined.  Add the eggs and mix them lightly.  Stir in the flour mixture.  Fold in the chocolate chips.  Be careful not to overmix the dough.
Drop the cookies 2 inches apart onto the cookie sheet(s) using two tablespoons or a cookie scoop.  
Bake for 12 minutes or until the edges and centers are brown.  Remove the cookies a wire rack to cool.


Come back every Thursday for a new Cookie/Treat/Sweet recipe.  Let the countdown begin!


Enjoy!

Mom's Cooking Club Lesson: If you do not have a Silpat, you must butter your cookie pan or your cookies will stick.  I had to butter my pans generously so these thin cookies wouldn't stick and fall apart as I took them off to cool.


Share


Wednesday, December 22, 2010

Cracked Sugar Cookies........12 Weeks of Christmas Cookies: Week 12


I had to include a sugar cookie on my last recipe for the 12 Weeks of Christmas Cookies.  As much as I love cut out sugar cookies, it is very time consuming.  So, I went with an easy drop sugar cookie with a unique cracked top.  A little crunchy with a light sugary coating on the outside makes for a really good sugar cookie. 

Cracked Sugar Cookies
Recipe slightly adapted from Allrecipes & Savory Sweet Life

Yield: 24 cookies

Ingredients

1 1/4 cups white sugar
1 cup butter, softened
3 egg yolks
1 teaspoon vanilla extract
2 1/2 cups all-purpose flour
1 teaspoon baking soda
1/2 teaspoon cream of tartar
Turbinado (coarse) sugar or granulated sugar

Directions

1. Preheat oven to 350 degrees F. Lightly grease 2 cookie sheets or use parchment paper.

2. Cream together sugar and butter. Beat in egg yolks and vanilla.

3. Add flour, baking soda, and cream of tartar. Stir.

4. Form dough into walnut size balls and roll in sugar of choice.  Place 2 inches apart on cookie sheet. Don't flatten. Bake 12 to 15 minutes, until tops are cracked and just turning color.  Remove from oven and allow to cool slightly before moving to a cooling rack.  

Note:  I rolled half the sugar cookie dough in coarse sugar and the other half in granulated sugar.  The ones with the coarse sugar had a little extra crunch to them.


It's been alot of fun participating in these cookie posts the last 12 weeks.  With the linky blog hop attached each week, I now have a ton of cookie recipes to try.  And so do you!  Check out the other cookies/treats I made the last 12 weeks:

Cracked Sugar Cookies


Enjoy!

Mom's Cooking Club Lesson:  Gift/Packaging Idea - These cookies are for Santa.  So, place on a cookie plate and leave out with a tall glass of milk.  Merry Christmas everyone!

Sunday, December 12, 2010

Chocolate Walnut Fudge.......12 Weeks of Christmas Cookies: Week 11


How about some chocolate fudge on your cookie trays this year?  You have to have some chocolate around the holiday season and what better way than with homemade fudge.  Quick and easy to make which is perfect during the last hectic weeks of Christmas.      


Chocolate Walnut Fudge
Recipe by Anne Thornton from Food Network

Ingredients

2 cups semisweet chocolate chips
1 cup milk chocolate chips
1 (14-ounce) can sweetened condensed milk
1/4 teaspoon fine sea salt
1 cup chopped nuts, optional, (recommended: toasted, salted walnuts)
1 1/2 teaspoons vanilla extract

Directions

In a heavy bottom saucepan over low heat, melt the chocolate chips with the sweetened condensed milk and the salt. Remove from the heat, stir in the nuts, if using, and the vanilla. Spread evenly into a foil-lined 8 or 9-inch square pan. Chill for 3 hours, or until firm. Remove the fudge from the pan and place onto a cutting board. Remove the foil from the bottom of the fudge and cut into squares. Store, covered, in the refrigerator or freezer.

Note:  I used chopped walnuts but did not toast them.  I stored my fudge in the refrigerator.  I recommend eating the fudge at room temperature. 


Enjoy!

Mom's Cooking Club Lesson:  Gift/Packaging Idea -  Package your fudge in a cute box or container.  You can get boxes like the one above at Target, Michaels or a variety of craft and kitchen stores. 


Sunday, December 5, 2010

Mandel Bread (Mandelbrodt)...........12 Weeks of Christmas Cookies: Week 10


This is a special cookie to me.  It's a family recipe by my grandmother and one that represents my Jewish heritage.  Since Hanukkah started last week, this is the perfect time to share this cookie from my childhood and culture.  Mandel Bread is a twice baked cookie similar to Italian Biscotti.  It has a cinnamon sugar topping.  Walnuts and/or chocolate chips can be added.

I have never made Mandel Bread until now.  I left that up to my grandmother and my oldest sister, Maxine.  My sister makes them every holiday season and I look forward to getting my fill whenever I get the chance to visit.  Well, now that I have finally made these cookies on my own (what took me so long), I can enjoy one of my favorite childhood cookies any time of the year.  And now, I can continue the tradition and pass on this family recipe to my daughters.

My grandmother (affectionately known as Motha) passed away many years ago but she was in the kitchen with me as I made her Mandel Bread.  Don't forget the family recipes and traditions this holiday season.  And maybe try some new recipes from other cultures as well.  


Mandel Bread
Recipe by my grandmother, Annette Sussman


Ingredients

3 large eggs, well beaten
3/4 cup vegetable or canola oil
1 cup sugar
2 1/2 - 3 cups flour ( I used closer to 3 cups)
2 teaspoons baking powder
1 tsp vanilla
pinch of salt
1 cup walnuts, chopped
semi-sweet chocolate chips, optional

Topping

1/4 cup sugar
1 teaspoon cinnamon

Directions

Preheat oven to 350 degrees.  Mix all the ingredients through salt in a mixer or my hand.  Fold in walnuts or chocolate chips, if using.  Place dough in the refrigerator for a couple of hours or overnight.  Divide dough into 3 or four equal parts and place in bread loaf pans.  Spread dough evenly into pans.  I use my hands for this.  Depending on how many you use, you will have 3 or 4 pans of dough.  The dough will be 1 or 2 inches high but it will rise some when it cooks. 

Bake for 20 - 25 minutes.  It should be crisp and a little golden brown.

Cut cookies into slices while still warm and still in loaf pans.  Sprinkle tops of Mandel Bread with mixture of cinnamon and sugar, divided evenly between pans.

Place loaf pans back in oven and bake for an additional 15 minutes.  Cool before removing slices from pan.  Store in airtight container.


Variation:  Add 1/2 cup or more chocolate chips to batter instead of nuts or with nuts.  I divided the dough in half and placed chopped walnuts in one and chocolate chips in the other half.


Enjoy!

Mom's Cooking Club Lesson:  Gift/Packaging Idea:  Place one or two pieces of Mandel Bread in a clear treat bag wrapped with a pretty ribbon.  Place in a large coffee or cappuccino cup with matching saucer.  For something extra special add a gift card to your local coffee shop.   


Saturday, November 27, 2010

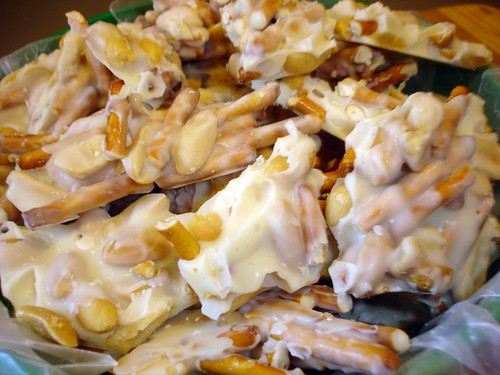
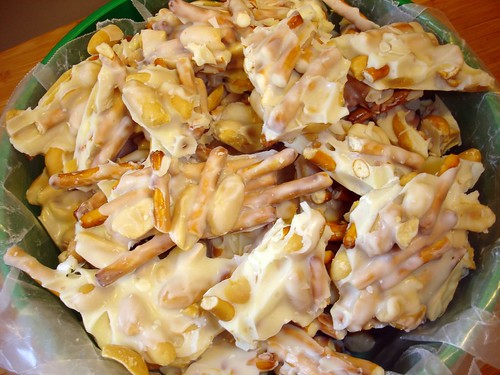
Pretzel Peanut Bark.........12 Weeks of Christmas Cookies: Week 9

Pretzel Peanut Bark

I hope everyone had a nice Thanksgiving.  Now the countdown to Christmas begins.  During this busy time, it's hard to find the time to make home baked cookies and treats.  This Pretzel Peanut Bark is perfect for this time of year.  It's easy, quick, only 3 ingredients and you won't be able to just eat one piece.  It's sweet, salty, crunchy and creamy.  So, put aside a little time this holiday season and make this homemade treat.  You will be thanked for it!


Peanut Pretzel Bark
Recipe by Paula Deen


Ingredients

18 (1-ounce) squares white chocolate (I used Ghirardelli Candy Making & Dipping Bar)
3 cups skinny pretzel sticks, broken into small pieces but not crushed, then measured
2 cups dry salted peanuts (I used Cocktail peanuts)

Directions

Line a rimmed cookie sheet with parchment or waxed paper.

Melt the chocolate in a double boiler over simmering water until smooth, or melt in the microwave in a 2 quart glass dish. Microwave on high (100 percent) for 1 minute, stir, and microwave on high for 1 minute more. If necessary, microwave on high for 10 seconds more, and stir until the chocolate is melted and smooth. Stir in the pretzel pieces and peanuts. Stir well with a flexible spatula.

Spoon onto the prepared cookie sheet, spreading the mixture out so that ingredients are relatively evenly distributed.

Allow for the chocolate to cool for several hours or refrigerate for about 45 minutes, until firm. Break the bark into irregular pieces, like peanut brittle. Store in cookie tins, or package in Chinese food take-out cartons lined with waxed paper.


Spread mixture of pretzel sticks, peanuts and melted white chocolate on cookie sheet.  The bark will harden quickly in the refrigerator.


Close-up Pretzel Peanut Bark

Enjoy!


Mom's Cooking Club Lesson:  Gift/Packaging Idea - I found these cute little Christmas tin buckets and treat bags in the $1.00 bin section at Target.  Place some Pretzel Peanut Bark pieces in treat bag and secure with twist tie.  Place in containers and share with teachers, neighbors, friends and relatives.  A treat made and packaged by you will bring such happiness to others.


Blog Design By: Sherbet Blossom Designs