Saturday, November 27, 2010

Pretzel Peanut Bark.........12 Weeks of Christmas Cookies: Week 9

Pretzel Peanut Bark

I hope everyone had a nice Thanksgiving.  Now the countdown to Christmas begins.  During this busy time, it's hard to find the time to make home baked cookies and treats.  This Pretzel Peanut Bark is perfect for this time of year.  It's easy, quick, only 3 ingredients and you won't be able to just eat one piece.  It's sweet, salty, crunchy and creamy.  So, put aside a little time this holiday season and make this homemade treat.  You will be thanked for it!


Peanut Pretzel Bark
Recipe by Paula Deen


Ingredients

18 (1-ounce) squares white chocolate (I used Ghirardelli Candy Making & Dipping Bar)
3 cups skinny pretzel sticks, broken into small pieces but not crushed, then measured
2 cups dry salted peanuts (I used Cocktail peanuts)

Directions

Line a rimmed cookie sheet with parchment or waxed paper.

Melt the chocolate in a double boiler over simmering water until smooth, or melt in the microwave in a 2 quart glass dish. Microwave on high (100 percent) for 1 minute, stir, and microwave on high for 1 minute more. If necessary, microwave on high for 10 seconds more, and stir until the chocolate is melted and smooth. Stir in the pretzel pieces and peanuts. Stir well with a flexible spatula.

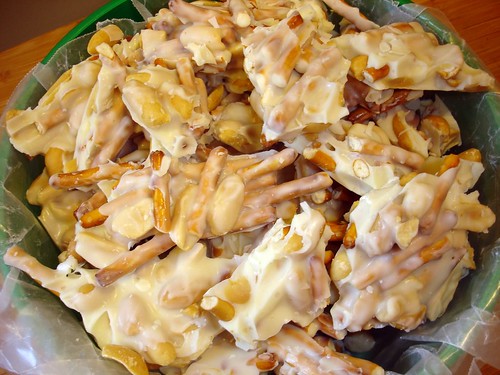
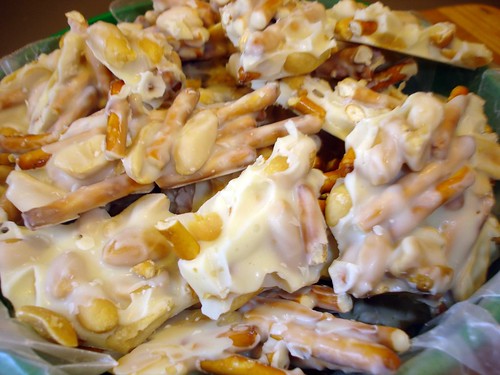
Spoon onto the prepared cookie sheet, spreading the mixture out so that ingredients are relatively evenly distributed.

Allow for the chocolate to cool for several hours or refrigerate for about 45 minutes, until firm. Break the bark into irregular pieces, like peanut brittle. Store in cookie tins, or package in Chinese food take-out cartons lined with waxed paper.


Spread mixture of pretzel sticks, peanuts and melted white chocolate on cookie sheet.  The bark will harden quickly in the refrigerator.


Close-up Pretzel Peanut Bark

Enjoy!


Mom's Cooking Club LessonGift/Packaging Idea - I found these cute little Christmas tin buckets and treat bags in the $1.00 bin section at Target.  Place some Pretzel Peanut Bark pieces in treat bag and secure with twist tie.  Place in containers and share with teachers, neighbors, friends and relatives.  A treat made and packaged by you will bring such happiness to others.


Monday, November 22, 2010

Ginger-Soy Chicken Thighs with Scallion Rice........The Kids Cook Monday!

Ginger Soy Chicken Thighs

I was feeling under the weather and the last thing I wanted to do was cook.  But I had some boneless, skinless chicken thighs in the fridge that needed to be cooked.  So, I thought my daughters (age 14) could make this simple chicken dish and I would just stand by and give them instructions. 

They made the rice.  Mixed in the sliced scallions.  Cooked the chicken in the skillet.  Made the sauce with apricot preserves, fresh ginger, soy sauce and garlic.  Cooked the sauce and coated the cooked chicken thighs in the sauce.  Placed the rice on a plate and put the glazed chicken thighs on top.  Added some string beans.  Dinner served.  Delicious.

Since this past August, my daughters have been helping me in the kitchen as part of The Kids Cook Monday program.  And I have seen some real changes in how they look at food.  They ask questions, they want to help and do more in the kitchen.  And the real plus is that they are trying more healthy and varieties of foods.  I could really get used to this Sous Chef thing.

For ideas on getting your kids to help more in the kitchen and to eat more family meals together, check out The Kids Cook Monday website.

My family wants to wish everyone a very Happy Thanksgiving!  Enjoy the time and food with your family, friends and loved ones. 


Ginger-Soy Chicken Thighs with Scallion Rice
Recipe by Cooking Light, November 2010, Slightly adapted

Yield: 4 servings (serving size: 2 thighs, about 1/2 cup rice, and about 1 1/2 tablespoons sauce)

Ingredients

4 servings of long-grain rice
2 tablespoons thinly sliced green onions
1 tablespoon olive oil
8 (2-ounce) skinless, boneless chicken thighs
1/2 cup apricot preserves
2 teaspoons grated peeled fresh ginger
2 tablespoons lower-sodium soy sauce
2 garlic cloves, minced

Preparation

1. Prepare rice according to package directions. Drain; fluff rice with a fork. Gently stir in green onions.

2. While rice cooks, heat a large skillet over medium-high heat. Add oil to pan; swirl to coat. Season chicken with a little salt and pepper.  Add chicken; cook 5 minutes on each side or until done. Remove from pan; keep warm. Add preserves, grated ginger, soy sauce, and garlic to pan; bring to a boil. Cook sauce 2 minutes or until reduced to 1/3 cup, stirring occasionally. Return chicken to pan; turn to coat with sauce.  Serve with rice.

Note: Original recipe calls for 1/2 cup ginger preserves.  You can substitute 1/2 cup apricot preserves plus 2 teaspoons grated peeled fresh ginger.


Ginger-Soy Chicken Thighs w/Scallion Rice


Enjoy!

Mom's Cooking Club Lesson:  If you need minced garlic in a recipe, a quick way is to run the peeled garlic clove over a Microplane Zester.  This was an easy and safe way for my daughter (or anyone) to mince the garlic needed for the ginger soy sauce. 

Friday, November 19, 2010

Pumpkin Swirl Cheesecake Bars.......12 Weeks of Christmas Cookies: Week 8

Pumpkin Swirl Cheescake

I just had to include a cheesecake dessert in my 12 Weeks of Christmas Cookies.  I know they aren't cookies but they could pass as a bar cookie.  Right?  Either way, if you love cheesecake as much as I do, you really have to make these for your dessert/cookie tray this year.  Cheesecake is really easy to make and the results are always so impressive.  These are super easy because you make them in a 9 x 13 pan instead of a Springform pan. (see instructions below for making a traditional cheesecake in a springform pan)

These cheesecake bars were for my husband's Thanksgiving work party.  I had to cut the bars at home and quickly take some pictures before he carted them off to work.  There were only a few left, so my thoughtful husband brought 2 home for me to try.  And I'm so glad he did!  They are soooooo good.  Creamy pumpkin cheesecake with a gingersnap and pecan crust.  And the swirls are so pretty. 


Pumpkin Swirl Cheesecake Bars
Recipe by Kraft Foods

Ingredients

25 NABISCO Ginger Snaps, finely crushed (about 1-1/2 cups)
1/2 cup finely chopped PLANTERS Pecans
1/4 cup butter, melted
4 pkg. (8 oz. each) PHILADELPHIA Cream Cheese, softened
1 cup sugar, divided
1 tsp. vanilla
4 eggs
1 cup canned pumpkin
1 tsp. ground cinnamon
1/4 tsp. ground nutmeg
Dash ground cloves

Directions

Preheat oven to 325°F

Mix crumbs, nuts and butter; press onto bottom of 13x9-inch pan.

Beat cream cheese, 3/4 cup sugar and vanilla with mixer until well blended. Add eggs, 1 at a time, beating after each just until blended. Remove 1-1/2 cups batter. Stir remaining sugar (1/4 cup), pumpkin and spices into remaining batter.

Spoon half the pumpkin batter into crust; top with spoonfuls of half the plain batter. Repeat layers; swirl with knife.

Bake 45 min. or until center is almost set. Cool completely. Refrigerate 4 hours.

Make it Easy:  Line pan with foil, with ends of foil extending over sides. Use foil handles to lift chilled cheesecake from pan before cutting to serve.

How to Prepare Cheesecake in Springform Pan:  To bake cheesecake in 9-inch springform pan instead, prepare as directed increasing the bake time to 55 min. to 1 hour 5 min or until center is almost set.

Cheesecake Tip:  To help avoid cracks in your cheesecake, place Springform pan in a baking pan.  Add boiling water to baking pan about 1 inch in depth.  Make sure to wrap bottom and sides of Cheesecake pan with tin foil to prevent water from seeping into pan.  The water surrounds the cheesecake with gentle even heat, reducing the chance of a cracked top.


Photo courtesy of Cuisine at Home


Pan of Pumpkin Swirl Cheesecake

I love the swirl effect.

Pumpkin Swirl Cheesecake

Enjoy!

Mom's Cooking Club LessonGift/Packaging Idea -  Make these Cheesecake Bars in a nice 9 x 13 pan, like these personalized, engraved pans from The Cake Pan Lady.  Give pumpkin bars and pan to your mom, sister, grandmother, aunt, friend, hostess of party or anyone on your gift list.  If putting out on your dessert table or office party, cut in bars and place on a nice holiday platter or silver tray.  Watch them disappear!


Monday, November 15, 2010

Spinach and Green Apple Salad.....The Kids Cook Monday!

Spinach and Green Apple Salad

This Monday, I have a simple but very good for you salad.  Baby spinach, green apples, walnuts, blue cheese with an apple cider vinegar and Dijon mustard dressing.  We really liked the sweet, tart and crunchy apples in this salad.  This would be a nice salad for your Thanksgiving table or your dinner table.


Spinach and Green Apple Salad
Recipe by Ellie Krieger, Food Network (slightly adapted)


Ingredients

2 tablespoons olive oil
1 tablespoon cider vinegar
1 teaspoon Dijon mustard
Salt and freshly ground pepper
5 ounces baby spinach leaves (about 5 cups lightly packed)
1 Granny Smith apple
1/3 cup walnut pieces, toasted in a dry skillet over a medium-high flame until fragrant, about 2 minutes
Blue Cheese (optional)

Directions

In a small bowl whisk together the oil, vinegar and mustard. Season with salt and pepper to taste.

Toss the spinach with the dressing until evenly coated then divide the spinach among 4 serving plates.

Core the apple and slice it into matchsticks. Sprinkle a quarter of the apple pieces on top of each salad.

Follow with the walnut pieces. If desired, crumble blue cheese on top of salad.  Serve immediately. 


For more information on getting your kids to help you prepare meals in the kitchen and eating together as a family, go to The Kids Cook Monday website. 


My daughter, Mariah, whisked the dressing.......


and cut up the apple.........


and tossed the salad with the dressing.

 Place on individual plates and top with apples, walnuts and blue cheese.

Enjoy!

Mom's Cooking Club Lesson:  Here are some other wonderful salads with fruit in them.  Perfect for Thanksgiving or anytime......

Friday, November 12, 2010

Cream Cheese Brownies.......12 Weeks of Christmas Cookies: Week 7

Cream Cheese Brownies

After 6 weeks of making cookies, I had to make a change.  And, in my book, there is no better change than brownies.  Brownies are one of my family's favorite treats.  I wanted to make brownies with a little something extra.  That something extra is cream cheese.  If you have never had the combination of cream cheese and brownies, you need to make these soon.  These brownies are in between cake-like and fudgy.  Full of chocolate flavor along with the slightly tangy cream cheese layers make a fantastic brownie.  


Cream Cheese Brownies

16 Squares

Ingredients

10 tablespoons unsalted butter, cut into pieces, plus more for pan
1 cup plus two tablespoons all-purpose flour
1/4 cup unsweetened cocoa powder
1/2 teaspoon baking powder
1/2 teaspoon salt
8 ounces semisweet or bittersweet chocolate, chopped ( I used Baker's Semisweet Chocolate )
4 ounces room-temperature bar cream cheese
1 1/2 cups sugar
4 large eggs

Directions

1.Preheat oven to 350 degrees. Brush a 9-inch square baking pan with butter or spray with cooking spray. Line bottom and two sides with a strip of parchment paper, leaving a 2-inch overhang on the two sides. Butter paper, and set pan aside. In a small bowl, whisk 1 cup flour, cocoa, baking powder, and salt; set aside.

2.Place 8 tablespoons (1 stick) butter and chocolate in a large heat-proof bowl set over (not in) a saucepan of gently simmering water. Heat, stirring occasionally, until smooth, 2 to 3 minutes; remove bowl from pan. Add 1 1/4 cups sugar; mix to combine. Add 3 eggs, and mix to combine. Add flour and cocoa mixture; mix just until moistened (do not overmix).

3.Prepare cream-cheese mixture: Whisk bar cream cheese with 2 tablespoons room-temperature butter. Whisk in 1/4 cup sugar, 1 egg, and 2 tablespoons all-purpose flour. Alternately spoon chocolate batter and cream-cheese mixture into pan; with the tip of a paring knife, swirl to marble.

4.Bake until a toothpick inserted in center comes out with a few moist crumbs attached, 50 to 60 minutes. ( check after 45 minutes ) Cool in pan for 30 minutes. Using paper overhang, lift brownies out of pan; transfer to a rack to cool completely (still on paper). On a cutting board, using a dampened serrated knife, cut into 16 squares. Store in an airtight container at room temperature, up to 2 days.

Note:  I put the chocolate batter in the pan and then spooned the cream cheese mixture over the chocolate batter.  I then took a knife and swirled the batter together back and forth from one side of the pan and then swirled again from the other side of the pan.  You can also put a layer of chocolate batter, dollop the cream cheese batter and then top off with remaining chocolate batter.  Then swirl.  This will put the cream cheese filling more on the top and center of the brownies instead of just the top. 


Plate of Cream Cheese Brownies


Close-up Cream Cheese Brownie

Enjoy!

Be sure to check out the Blog Hop below to see more recipes for the 12 Weeks of Christmas Cookies.


Mom's Cooking Club Lesson Gift/Packaging Idea -  A simple way to package these brownies....wrap a large brownie square in wax paper and tie a festive Christmas ribbon around it.  Place little treat package on your bosses or co-workers desk.  Give to your child's teacher or someone special.  If you are having a dinner party, put a little brownie package with a recipe card at each person's place setting. 

Monday, November 8, 2010

Orange-Glazed Salmon with The Kids Cook Monday!

DSC04798

This is some seriously good salmon.  Trust me.  It is.  And what makes it better is that I got my girls to help me prepare dinner and enjoy this healthy meal.  Even my, "I don't like fish", daughter, Mariah, ate a bigger piece this time.  The spicy rub paired with the slightly sweet glaze is the perfect match with the salmon.  This meal may look fancy but it is very easy and quick to prepare.       

"The Kids Cook Monday program is an initiative encouraging families to cook and eat together each Monday. Start your week off right: make Monday family night!"

Check out The Kids Cook Monday! updated website with more resources to help you start your Monday's off on a positive note.  Get more information on the other Monday campaigns, like Meatless Monday and Move It Monday! 

Orange-Glazed Salmon
Recipe by Cuisine at Home Preview Magazine


Serving:  4 fillets

Ingredients

3 tablespoons Cajun seasoning (use a prepared one or make your own like this one)
1 teaspoon brown sugar
1/4 teaspoon kosher salt
4 boneless, skinless salmon fillets (6 oz. each)
2 tablespoons vegetable oil
1/4 cup Seville orange marmalade (like Crosse & Blackwell)
1 tablespoon lime juice

Directions

Combine Cajun seasoning, brown sugar and salt in a small bowl.  Rub over both sides of fillets.
Saute fillets in oil in a large non-stick skillet over medium-high heat for 3-4 minutes.  Turn and saute an additional 2-3 minutes.
Blend marmalade and lime juice; swirl in skillet until melted.  Carefully turn fish to glaze on all sides.  The salmon is done when it begins to flake when tested with a fork.    


DSC04771

Marissa takes the Cajun seasoning and rubs it on both sides of the salmon.  Use less rub for less heat.  

Orange Glazed Salmon

The glaze is a mixture of Seville orange marmalade and lime juice.

orange-glazed salmon

Enjoy!

Mom's Cooking Club Lesson:  Seville orange marmalade is more acidic than other orange marmalades.  I used the brand Crosse & Blackwell which states on the label, "Made with Seville Oranges".  If you can't find Seville orange marmalade, use a sweet marmalade and double the lime juice.

Friday, November 5, 2010

Butterscotch Chip Spice Cookies.....12 Weeks of Christmas Cookies: Week 6

Butterscotch Chip Spice Cookies

It's week 6 of the 12 weeks of Christmas Cookies.  Halfway through.  Why does this time of year just fly by? 

If you are a fan of butterscotch you will really like these cookies.  The ingredients of cinnamon and ginger add a slight spice to the cookie.  These are very sweet cookies that are on the crunchy side with a slight chewiness.  Another very good cookie for your Christmas tray.

Make sure to check out the blog hop below for other great cookie and treat recipes. 


Butterscotch Chip Spice Cookies
Recipe by Cuisine at Home, 2010 Cookie Mini Cookbook

(printable recipe)

Servings: 4 dozen

Ingredients

2 cups all-purpose flour
1 teaspoon ground cinnamon
1 teaspoon ground ginger
1 teaspoon baking soda
1/2 teaspoon salt
1 cup unsalted butter (2 sticks), room temperature
1 1/2 cups packed brown sugar
1 large egg
1 teaspoon vanilla extract
12 ounces butterscotch chips
powdered sugar (optional)

Directions

1. Stir flour, cinnamon, ginger, baking soda, and salt together in a small bowl; set aside.

2. Cream butter and brown sugar with a mixer until smooth.  Beat in egg and vanilla.

3. Mix in flour mixture just until blended.  Do not overmix or cookies could become tough.

4. Fold in butterscotch chips, then cover and chill dough until firm, about 1 hour.

5. Preheat oven to 350 degrees.  Line 2 baking sheets with parchment paper.  Shape dough into 2 inch balls and arrange on prepared baking sheets, spacing 3 inches apart.  Bake 12 to 14 minutes, or until golden and just set.  Let cookies cool on the pan for 5 minutes, then transfer to a rack.

Option:  The original recipe states to roll the cookie dough balls in powdered sugar before placing on baking sheets.  This is a very sweet cookie and I found that rolling in the powdered sugar was not needed. 


Butterscotch Chip Cookies

Enjoy!


Mom's Cooking Club LessonGift/Packaging Idea -  Make your cookie giving and sharing more fun by putting them in cute packages like the one here.  I found these Christmas printed "take-out" packages at Michaels for $1.00.  They have several different prints.  I added a cute Christmas ribbon on the handle.  Take-out cookies anyone?    

Wednesday, November 3, 2010

Double Corn Bread.......November's Cooking Light Virtual Supper Club

Double Corn Bread

It's time for another month of the Cooking Light Virtual Supper Club.  I've been doing this monthly group since July 2009 and every month this group of five bloggers comes up with a themed menu, all with recipes from Cooking Light that we share with each other and you virtually.  We have had some group changes along the way and this month Shelby and Patsy leave us but we say hello again to Helene from our original group and welcome Mary Ann from Meet Me in the Kitchen.  We're so happy to have both of these wonderful ladies in our Cooking Light Supper Club.

Sandi picked November's theme:   A Celebration of Corn   

My side dish to celebrate corn is some Double Corn Bread.  Corn meal and whole corn kernels give this corn bread it's double corn flavor.  I love the texture and flavor of adding corn kernels to corn bread.  The outside got a nice crust to it which is just how we like it.      


Double Corn Bread

Ingredients

1 cup all-purpose flour
1 cup yellow cornmeal
2 tablespoons sugar
2 teaspoons baking powder
1/2 teaspoon salt
1/2 teaspoon baking soda
1 cup low-fat buttermilk
1/2 cup frozen whole-kernel corn, thawed
1/2 cup diced red bell pepper ( I left this ingredient out )
4 tablespoons butter or stick margarine, melted
1 large egg, lightly beaten
Cooking spray

Preparation

Preheat oven to 425°.

Lightly spoon flour into a dry measuring cup, and level with a knife. Combine flour and next 5 ingredients (flour through baking soda) in a large bowl, and make a well in center of mixture. Combine buttermilk and next 4 ingredients (buttermilk through egg) in a bowl; add to flour mixture. Stir just until moist. Spoon batter into an 8-inch square baking pan coated with cooking spray. Bake at 425° for 20 minutes or until a wooden pick inserted in center comes out clean. Let stand 10 minutes.

Note:  I made my cornbread in a cast iron skillet.  I heated the pan up in the oven for a few minutes, added a tablespoon of butter to pan.  I took the pan put of the oven, swirled the butter around until melted and added batter to pan.  Batter is thick so spread carefully in pan.  I baked until golden brown, around 18 minutes.

See the list below on the other corn dishes that everyone else made.  I hope you find something you like to celebrate such a versatile vegetable.

Jamie (me) - Double Corn Bread
Mary Ann (Meet Me in the Kitchen) brought Greens with Roasted Corn and Pepper Salad
Sandi (Whistlestop Cooking Cafe) made the main dish of Curried Corn Crab Cakes
Val (More than Burnt Toast) brought a side dish of Creamed Corn with Bacon and Leeks
Helene (La Cuisine d'Helene) ended our meal with her Lemon-Cornmeal Cookies  

***If you have a "light" recipe using corn, please link it to our linky tool at the bottom of this post.  It doesn't have to be a Cooking Light recipe but any healthy recipe using corn.***

Enjoy!

Mom's Cooking Club Lesson:  If you do not have a cast iron skillet, I highly recommend one.  Not only are they perfect for making corn bread but they are an excellent skillet for pan frying fish or any meat.  They retain their heat and cook food evenly.  It would be a great gift or to put on your own Christmas wish list.

Monday, November 1, 2010

Barbecue Sirloin and Blue Cheese Salad.......The Kids Cook Monday!

Barbecue Sirloin and Blue Cheese Salad

My girls helped me in the kitchen last night before they went out trick or treating for Halloween.  This was a quick meal to put together and it was delicious.  The spice rub was perfect on the steak.  If you're a fan of blue cheese, you will love the combination of the cheese with the beef.  If your kids don't like Blue Cheese (like mine), just don't include it on their plate.  The salad dressing uses a few ingredients and it was light and refreshing.  This was a very good salad entree meal that my family will make again.  For other family meal tips, check out The Kids Cook Monday website.   


Barbecue Sirloin and Blue Cheese Salad

Yield: 4 servings
(serving size: about 1 1/2 cups salad, 3 ounces steak, and 2 tablespoons cheese)

Ingredients

2 teaspoons chili powder
3/4 teaspoon ground cumin
1/2 teaspoon garlic powder
1/2 teaspoon salt, divided
1/4 teaspoon black pepper, divided
1 pound lean sirloin steak, trimmed
Cooking spray
2 tablespoons white wine vinegar
2 teaspoons Dijon mustard
1 tablespoon extra-virgin olive oil
6 cups torn Bibb lettuce ( I used 1 bag of pre-packaged Sweet Butter lettuce mix)
3/4 cup thinly sliced peeled cucumber
1 cup red bell pepper strips ( I used a green bell pepper - that's what I had in my fridge)
1/2 cup thinly sliced shallots
1/2 cup (2 ounces) crumbled blue cheese


Preparation

1. Combine chili powder, cumin, garlic powder, 1/4 teaspoon salt, and 1/8 teaspoon black pepper; rub evenly over both sides of steak.

2. Heat a grill pan over medium-high heat. Coat pan with cooking spray. Add steak to pan; cook 5 minutes. Turn steak over; cook 4 minutes or until desired degree of doneness. Place steak on a cutting board; let stand 5 minutes. Cut across grain into thin slices.

3. Combine vinegar, mustard, remaining 1/4 teaspoon salt, and remaining 1/8 teaspoon black pepper in a small bowl, stirring with a whisk. Gradually add oil, stirring with a whisk. Combine lettuce, cucumber, bell pepper, and shallots in a large bowl. Drizzle vinaigrette over salad; toss gently to coat. Top salad with steak and cheese.

Note:  I did add a little more oil to my salad dressing based on my taste.  Adjust how much oil you use based on how you like the taste of your salad dressing.


Marissa read the recipe on her own and mixed up the steak spice rub...... 


.......and rubbed the spice mixture on both sides of the sirloin.  Marissa also mixed up the salad dressing and Mariah helped me cut the vegetables for the salad.

Barbecue Sirloin

My husband, Mike, grilled the steak and cut it in thin slices.  The rub on the steak was delicious and it's one I will use again.


Sirloin Salad

Enjoy!

Mom's Cooking Club Lesson:  All-in-one meals like this are a great way to get your lean protein and vegetables all in one plate.  You can take your favorite grilled beef, chicken or shrimp and add it to a salad with your favorite vegetables.  Try a light and flavorful vinaigrette like this one to complete the taste.   


Teenage Zombies!

Hope everyone had a fun and safe Halloween!
 
Blog Design By: Sherbet Blossom Designs